This place is amazing. Got our manual in a few hours. Print quality is excellent. Even the manufacturer didn't have this manual. The price was excellent. How many more stars can I give them? More than satisfied.
Text excerpt from page 16 (click to view)
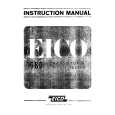
Montage des Aktivkohlefilters
Gilt nur für den Umluftbetrieb. Vorsicht! Es müssen alle vier Federn verwendet werden um eine nutzvolle Funktion zu gewährleisten. 8 10 9
1 1. Auszug 1 herausziehen. 2. Metallfilter 5 herausnehmen. 3. Anschlagfedern 8 hinten links und hinten rechts auf der Längsseite der Abzugsöffnung zwischen Blech- und Kunststoffgehäuse bis zum Anschlag einschieben. 4. Rastfedern 9 vorne an den Schmalseiten der Abzugsöffnung zwischen Blech- und Kunststoffgehäuse bis zum Anschlag einschieben. 5. Aktivkohlefilter 10, in Pfeilrichtung nach oben, zuerst hinten in die Anschlagfedern 8 schieben, dann vorne einschnappen. 6. Metallfilter 5 einsetzen. Steckdose 9 8 9 8 5
Elektrischer Anschluss / Zuleitung
Achtung! Der Elektroanschluss muss von einem konzessionierten Installateur ausgeführt werden. Vorsicht! Der Stecker muss nach dem Einbau zugänglich sein. Es ist eine Steckdose Typ 12 oder Typ 13 vorzusehen. Die Länge des Anschlusskabels beträgt ca. 1 m. Beim Ersatz der Anschlussleitung ist ein Kabeltyp von mindestens H05RR-F vorzusehen (Ersatzteil-Nummer 375 0432-00/1). G
Installation eines exter� nen Zuluftventils
Es besteht die Möglichkeit durch den Elektro-Fachmann ein externes Zuluftventil zu installieren. Die �ffnung B im Deckel G zusammen mit der Zugentlastung ist für den Anschluss eines externen Kabels vorgesehen. Anschluss mittels AMP-Stecker 6,3 x 0,8 mm auf den Klemmennummern 5, N, E und je nach Ventiltyp auf L (dauernd unter Spannung). Externer Ausgang (Lüfter) Netzanschluss