Having bought a pre-owned Sony FM stereo tuner through eBay, it came without any manuals. It soon became clear that to get the best from this excellent tuner I needed a decent manual because much of the operation was not intuitive to a newboy to hi fi like me. I managed to download the official Sony multi-lingual manual from Owner-Manuals.com with no problem at all - a really quick and easy service. I'm very glad I did because I found out all the operations of the tuner and was then able to not only set it up quickly but also to get much more from it that poke-and-hope trialling would ever achieve. In my book $4.99 very well spent.
This manual is immaculate in it's accuracy. Everything is written very clearly and easy to understand. Written by a professional who wants to convey a clear and easy to understand message!!
Great site, I always find all the manuals I need and i can't find anywhere else. PDF for the Sony PCM 3348 is complete and scan is good quality. Thank you!
Text excerpt from page 11 (click to view)
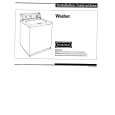
Cut Out Size
The dimensions of the cut-out are given in the diagram.
5 m
30 550
FO 2098
ON/OFF SWITCH
Building In
Building over a cupboard or drawer
If the hob is to be installed above a cupboard or drawer it will be necessary to fit a heat resistant board below the base of the hob on the underside of the work surface. It is also recommended to carry out the electrical connection to the hob as shown in diagrams 1 and 2.
FLEX OUTLET
4 7 0
i n.
1
Building over a kitchen unit with door
Proper arrangements must be taken in designing the furniture unit, in order to avoid any contact with the bottom of the hob which can be heated when it is operated. The recommended solution is shown in diagram 3. The panel fitted under the hob ("a") should be easily removable to allow easy access if technical assistance is needed. The space behind the kitchen unit ("b") can be used for connections.
FO 0763
ON/OFF SWITCH
2
3
a
60
FLEX OUTLET
b
30 20 min
Fitting the hob to the worktop
Before fitting the hob into the cut out, an adhesive seal must be fitted to the underside outside edge (Fig. 4) of the hob. It is essential that no gaps are left in this seal in order to prevent spillage near the hob seeping into the cabinet below. 1) Remove the pan supports, the burners caps and crowns and turn the hob upside down, taking care the ignition candles are not damaged in this operation. 2) Place the sealing gasket all around the glass top edge as shown in diagram 4. 3) Fit the hob in the cut out and push it down until the glass top and the working top make contact, as shown in diagram 5.