I am very happy with the owner's manual. I bought a used Casio and was so relieved that I was able to get a hold of a owner's manual. It was very easy to download the manual and I had no problems with printing it. Thank you! Nancy Whalen
Very satisfied with received document, all is right, Thank You very much, it was a Pleasure to work with You.
Text excerpt from page 9 (click to view)
Building In
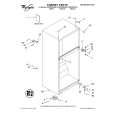
Fig. 8
510
290
These hobs can be inserted in a built-in kitchen unit whose depth is between 550 and 600 mm. The hobs dimensions are shown in Fig. 8.
650 MIN.
Installation and assembly
These hobs can be installed in a kitchen unit with an opening for insertion whose dimensions are shown in Fig. 9. The edge of the cut out must have a minimum distance from the rear wall of 55 mm. If there are side walls, or sides of the furniture unit near the hob, the cut out edges must have a minimum distance of 100 mm. Hanging forniture units or hoods must be placed at 650 mm minimum from the hob. Carry out the building in of the hob as follows: 1. Put the relevant sealings, supplied with the hob, on the edges of the cut out, taking care that the sealings meet without overlapping; 2. place the hob in the cut out, taking care of its centring; 3. fix the hob with the relevant screws (Fig. 10). The traction of the screws is able to trace the sealing, any excess of which can then be easily removed.
49
0
55 27 0
40÷50
24
0
550 MIN
591
140
Fig. 9
If several 30cm hob are to be installed side by side into the same cut out, an assembly kit including a support side bracket and supplementary sealings is available at our After Sales Centres. The relevant installation instructions are supplied within the kit package.