perfect! you just sent to me the copy in Italian witout even my specification!!!! so you are really smart cooperative and efficient. To my opinion the best place all over to get a manual of electronics!!!!
Super nice! Good to have a manual in digital format.
Text excerpt from page 27 (click to view)
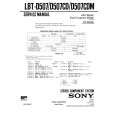
3. Remove both plastic caps sideways.
3
Special spanner A and sealing caps B (2 off) and C (1 off) are supplied with the appliance. 4. Remove screw D with its compression spring using special spanner A. 5. Turn sealing cap C upside down as shown in the illustration. 6. Seal hole using sealing cap C.
7. Unscrew and remove two screws E using special spanner A. 8. Unscrew and remove four screws F using special spanner A. 9. Remove transit bar G. 10. Screw in the four screws F again. 11. Seal the two big holes using sealing caps B. Important! Press all sealing caps B (2 off) and C (1 off) in firmly, so that they snap into place. (Splash protection).
Where to install
Important! The appliance must not be used in a room where there is a danger of frost. Frost damage or impaired operation! Frost damage is not covered by the warranty. � The surface on which the appliance is to be installed must be firm and level. Do not install the appliance on carpets or on soft floor coverings.