Shopping cart is empty
 
English Polski Spanish 
Search For a Manual
 

(e.g. AA-V20EG JVC, ZX-7 Sony )
PayPal 1000+ rating Secure, Encrypted Checkout.
 
Who's Online
There currently are 6043 guests online.
Support Info
ELECTROLUX
First point of contact:
All trademarks are the property of their respective owners
Categories
Information
Featured Product
Home >> REX-ELECTROLUX >> OG60X Owner's Manual
 
 0 item(s) in your cart 

REX-ELECTROLUX OG60X
Owner's Manual


Tweet about this product and get $1.00 of store credit for instant use!
  • Download
  • PDF Format
  • Complete manual
  • Language: Portuguese
Price: $4.99

Description of REX-ELECTROLUX OG60X Owner's Manual

Complete owner's manual in digital format. The manual will be available for download as PDF file after You purchase it.

Owner's Manual ( sometimes referred to as User's Guide or User's Manual ) contains information on how to use Your device. After placing order we'll send You download instructions on Your email address.

The manual is available in languages: Portuguese

Not yet ready
You must purchase it first

Customer Reviews
There are currently no product reviews.
Other Reviews
 RX-505VLTN JVC Owner's Manual by John Heizer;
Absolutely perfect! I've been trying to understand how to use all or at least some of the features of the receiver and especially the remote.
 PM2521 PHILIPS Owner's Manual by David Jesson;
Copy of genuine owners/operators manual, very useful
 RDB365D CLARION Owner's Manual by Tina Whisnant;
The manual was a perfect match and was exactly what I was looking for. I'm very satisfied with my purchase.
 CXNA10 AIWA Owner's Manual by Roberta Barr;
Thank you for having the manual I needed for an older model Aiwa stero I had found on Ebay --- I wanted the Aiwa because I had tapes and cd's but I did not have a manual as to how to operate the system... I found what I needed and it has enabled me to set the system up for my enjoyment.
 S310 JBL Owner's Manual by Jos Vallen;
I wished detailed information of the JBL S310 and here I found it! Very happy with the service from this site!

Text excerpt from page 9 (click to view)
Instalação Elétrica
Limpeza da porta do forno
� possível retirar a porta do forno para fazer uma limpeza completa. Para isso, siga os procedimentos abaixo: 1. Abra a porta completamente. 2. Localize as duas dobradiças que fixam a porta do forno (Figura 26). 3. Levante e abra completamente as travas das dobradiças (Figura 27). 4. Segure a porta dos dois lados e feche-a lentamente até que ela toque nas travas (Figura 28). 5. Levante a porta com cuidado, desencaixando-a das dobradiças. 6. Coloque a porta em um local seguro e forrado. Limpe o vidro apenas com água morna. Evite o uso de panos ásperos. Depois da limpeza, coloque a porta no forno seguindo os mesmos procedimentos na ordem inversa. Antes de fazer a ligação certifique-se que: O redutor do gás e a instalação elétrica doméstica podem suportar a carga do produto (ver etiqueta de identificação do produto). A rede de alimentação elétrica está corretamente aterrada, segundo as normas e as disposições da lei em vigor. A tomada ou o disjuntor usados para a ligação são de fácil acesso depois que o forno estiver instalado. O cabo elétrico com plugue alcança a tomada. O cabo elétrico deverá ser colocado de forma a não atingir uma temperatura superior de 50oC a mais que a temperatura ambiente de onde foi instalado o produto. Depois de efetuada a ligação teste o grill, fazendo-o funcionar por aproximadamente 3 minutos.

Figura 26

Figura 27

Caixa de Junção
Figura 28

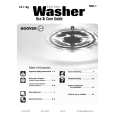
Limpeza da Grelha e Apoios
Os apoios da grelha podem ser removidos facilmente para a limpeza (veja figuras 1 e 2 ao lado). Desatarraxe a peça de fixação dos apoios da grelha. Quando fizer esta operação, mantenha o apoio da grelha na posição inicial e com a outra mão desencaixe o gancho traseiro. Assegure-se que as peças de fixação dos apoios da grelha estejam guardadas em segurança para serem utilizadas novamente na montagem do apoio da grelha. Para limpar a grelha e os apoios das grelhas, deixe-os de molho em água morna com sabão. Remova manchas teimosas limpando com uma esponja impregnada de sabão. Enxágue bem e seque com um pano suave. Monte os apoios da grelha realizando a operação inversa das figuras.

Na parte traseira do forno existe uma caixa de junção (Figura 5) de fácil acesso, específica para funcionar com uma tensão de alimentação de 220 V monofásica.

Figura 5

24

9

You might also want to buy

$4.99

SX-K700 TECHNICS
Owner's Manual

Complete owner's manual in digital format. The manual will be available for download as PDF file aft…

$4.99

CJ-V51 PIONEER
Service Manual

Complete service manual in digital format (PDF File). Service manuals usually contains circuit diagr…

$4.99

GRAND PRIX ELECTRONIC 754 BECKER
Service Manual

Complete service manual in digital format (PDF File). Service manuals usually contains circuit diagr…

$4.99

SX-PR602 TECHNICS
Service Manual

Complete service manual in digital format (PDF File). Service manuals usually contains circuit diagr…

$4.99

EV-S1000E SONY
Owner's Manual

Complete owner's manual in digital format. The manual will be available for download as PDF file aft…

$4.99

GRAND PRIX ELECTRONIC 780 BECKER
Service Manual

Complete service manual in digital format (PDF File). Service manuals usually contains circuit diagr…

$4.99

AG7330 PANASONIC
Service Manual

Complete service manual in digital format (PDF File). Service manuals usually contains circuit diagr…

$4.99

EVO-9850 VOLUME 1 SONY
Service Manual

Complete service manual in digital format (PDF File). Service manuals usually contains circuit diagr…
>
Parse Time: 0.162 - Number of Queries: 140 - Query Time: 0.045