I found my Clarion VRX8370R in the Camper I bought and I wasn't able for month to understand it.
The Owner Manual was perfect and just what I was searching for.
Thank you.
Leonardo
I AM HIGHLY IMPRESSED BY THE EASE OF USE OF THIS DOWNLOAD SERVICE. INSTRUCTIONS ARE CLEAR AND SIMPLE TO FOLLOW....EVEN BY TECHNOPHOBES SUCH AS MYSELF. THE EMAILS POINT YOU IN THE RIGHT DIRECTION...ITS SO EASY PEASY. THE DOWNLOAD CHOICE OF USER MANUALS IS EXTENSIVE AND I COULD NOT FIND A CHEAPER OR MORE EFFICIENT SERVICE ON THE INTERNET. I COULD NOT HAVE MADE A BETTER CHOICE OF INFORMATION PROVIDER. SHOULD I EVER NEED ANOTHER USER MANUAL, THEN THIS IS THE FIRST CHOICE SITE. COULD NOT BE BETTER PLEASED!!!!!!!...MANY THANXES FROM JIM BURNS
Text excerpt from page 19 (click to view)
Asennus
Asennus
Lieden asennuksen ja korjaukset saa suorittaa vain asennusoikeudet omaava huoltoliike tai henkilö. Liesi on painava. Reunat ja kulmat, joihin sinun ei yleensä tarvitse koskea saattavat olla teräviä. Käytä käsineitä liettä siirrettäessä.
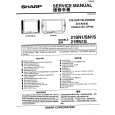
Tarkista ennen lieden asennusta, että sen mitat ovat keittiökalusteiden mukaiset. Mittaa työpöydän korkeus lattiasta tason yläreunaan ja jalustan syvyys seinästä jalustan reunaan (KATSO KUVA). Liesi voidaan myös asentaa seinän tai vaihtoehtoisesti korkean kaapin viereen. Lieden jalusta on toimitettaessa sovitettu 90 cm työtasokorkeuteen ja 55 cm kalustesokkelisyvyyteen. Ellei tämän lieden korkeusmitta ole sopiva, sitä voidaan muuttaa korkeudelle 88 tai 85 cm (katso alta). Tarkista, ettei lieden johto jää puristuksiin liettä liikutettaessa.
55
Aseta esim. pakkauksessa oleva suojakappale lattian ja lieden väliin. 2 Ole varovainen, lieden alla on teräviä reunoja. Irrota ruuvi A (1 KPL) jalustan takaosan keskellä sekä ruuvit B (4 KPL, KATSO KUVA).
3 Siirrä jalustan sisempi osa haluamallesi korkeudelle, joko 85, 87 tai 90 cm (KATSO KUVA). 4 Kiinnitä uudelleen ruuvit A ja B.
KUVA).
B
A
B
B
B
90 88 85
Asennus vaakasuoraan
Lieden on oltava vaakasuorassa, jotta esim. rasva leviäisi tasaisesti paistinpannun pohjalle. Tarkista vaakasuoruus asettamalla vesivaaka tai vedellä täy-tetty paistinpannu keraamiselle tasolle. Lieden jalkoja ja pyöriä voi tarvittaessa nostaa ja laskea (-6, +12 mm) jalustan etupuolelta. Säädä etujalat moniotepihdeillä ja takapyörät ristipää-ruuvitaltalla.
Sähköliitäntä
Lieden asennuksen ja korjaukset saa suorittaa vain asennusoikeudet omaava huoltoliike tai henkilö. Puutteellisesti suoritettu työ saattaa heikentää lieden toimintaa ja aiheuttaa henkilö- ja/tai omaisuusvahinkoja.
Liitäntäohje on liitäntäriman välittömässä läheisyydessä. Lieden liitäntäteho ja jännite on mainittu arvokilvessä, joka on lieden oikealla sivulla.