Using the Crossfader
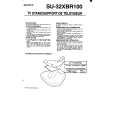
The crossfader is the one feature that instantly sets the DJ mixer apart from a conventional mixer. It lets you smoothly fade from one track into another using a single fader. It is also used as a creative performance tool to layer or interact between two sounds when cut or scratch mixing . A high grade dual rail fader with long lasting gold contacts is used. The ultra high quality Penny & Giles type can be fitted as an option if preferred. The XONE:32 uses four high performance voltage controlled amplifiers (VCAs), a pair for each side of the stereo crossfader. The robust 45mm fader produces a DC control voltage which determines the signal level of the VCAs. The voltage is filtered to prevent any audible noise, clicks or scratchiness resulting should the fader track become worn. This benefit would not be possible if the signal were routed through a conventional audio fader. Using the fader as a controller also means that its response can be easily tailored to suit the mixing style. CH1 feeds the left �X� side of the crossfader so that all the signal is routed when the fader is at its fully left position. CH3 feeds the right �Y� side of the crossfader. CH2 does not feed the crossfader. Instead, it routes directly to the mix. The OFF switch lets you disable the crossfader so that it does not affect the channel levels. Select this when your mixing session does not need crossfading. The front panel green LED lights when the crossfader is on and extinguishes when it is off. Use the CONTOUR control to adjust the way the fader responds as you move it. You can adjust from a very gentle fade with 6dB dip in the middle suitable for smoothly fading in one track as the other fades out, to a very sharp response where the signal reaches full level within a few millimetres of the start of travel, suitable for fast cut or scratch mixing. The middle position provides a standard constant power fade where the volume remains the same as you fade from one track to the other.
DIP CONSTANT POWER CUT
0dB -6 -12 -18 -24 -30 -36
0dB -6
0dB -6
-6dB
-12 -18 -24 -30 -36
-3dB
-12 -18 -24 -30 -36
0dB
Use the REVERSE switch to swap the X and Y sides of the crossfader so that CH1 feeds the right hand Y side and CH3 feeds the left hand X side. Use this function if it better suits your mixing style.
Replacing the Crossfader
The crossfader on a DJ mixer is heavily used and can suffer considerable wear and tear. The audio design using VCAs prevents clicks and scratchiness as the fader wears. However, the movement can become mechanically stiff or sloppy in time, or become ingrained with dirt. Should this be the case the fader may need replacement. The XONE:32 crossfader is removable and can easily be replaced in a few minutes. There are two versions available, the standard type and the higher grade Penny & Giles type. Make sure you order the correct version from your Allen & Heath dealer. Use a medium size cross-point (Pozidriv) screwdriver to undo and remove the two outer screws on the crossfader plate. Do not remove the inner screws. Lift the crossfader assembly up and away from the console panel. Unplug the cable from the old crossfader and plug in the new assembly. Check that the connector is correctly aligned and pushed on. Replace the assembly making sure the cable faces the left side of the console. Refit the screws and test operation.