Actually, I was looking for this information for 3 years!...now thanks to you, the manual is on my hands and of great help, cause I understand now where I was doing wrong connections and wires...excellent, I'll be back to you if in need, thank you.
This manual covers the main equipment features only. While it also includes the procedure for saving and loading from the now long obsolete memory cards it does not mention the how to operate with the optional floppy drive interface so I am still at a loss about how to use this! Note that there is a separate manual covering the MIDI interface and programming via the keyboard, not included in this download. You will also need to get hold of this if you want to use the MIDI interface properly. Basically there is little difference between this manual and the free to download manual for the similar PR60 model.
Text excerpt from page 14 (click to view)
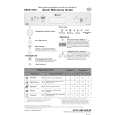
2. Push the appliance into place. The plug socket necessary for connection of the appliance to the electricity supply should be positioned, so that the plug is not placed in the recess. 3. To adjust the height proceed as follows: - Loosen or tighten the two front feet. - The rear feet are adjusted by turning the screw in the front kick plate to the left or right.
4. The joint cover (B) is to be assembled after having installed the appliance in the recess.
1
596
B
555 x ma
4
+ +
5. Screw appliance into place and retain the cabinet with screws (I) through the securing brackets into the worktop or adjacent woodwork as necessary.
3
max. 890 mm
I
5
6. To mount the furniture door proceed as shown in the figures: