|
|
|
Categories
|
|
Information
|
|
Featured Product
|
|
|
 |
|
|
There are currently no product reviews.
 ;
Very satisfied! I was searching for several days, but nope; till I discovered your webside and there it was at a very reasonable price. Keep up the good work!
Paul
Flanders
 ;
Generally speaking good copy; a few pages too hard contrast...
Good service and communication.
;
I purchased the unit from a private party and the original owners manual was not available. Having the ability to download it was extremely helpful and clarified operating the equipment immensely. This is a complicated unit and without the manual I would not have been able to maximize it's potential. Thank you.
;
Being a user of older radios of many kinds, preferring them over more modern rigs, this manual was invaluable in the programming of my two. I now know for certain what the assorted buttons functions are, and am very grateful to have found this excellent site. Many thanks for your assistance, Tony.
;
Clear and easy to read. All details as expected. Price acceptable , and quick delivery.
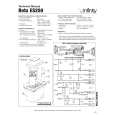
WALL-MOUNTING
The Infinity Beta ES250 speaker is designed to mount directly to a wall. Each speaker has (4) keyholes in the rear to allow either left- or right-side placement. Each speaker will require (2) 1-1/2" (38mm), #8 wood screws fastened to a wall stud. If a wall stud is unavailable, install an anchor appropriate for a 1-1/2" (38mm), #8 screw. Use the supplied template to accurately position the screws on the wall and refer to the diagrams for more assistance. NOTE: The customer is responsible for the correct selection and use of mounting hardware (available through hardware stores) that will ensure the proper and safe wall-mounting of the speakers. Step 1. Position the supplied wall-mount template on the wall in the desired speaker location. Make two markings per speaker.
11-13/16" (300mm) 8-3/8" (213mm) 4-3/16" (107mm)
2-7/16" (62mm)
13-3/4" (349mm)
Wire Channel
Figure 11. Step 2. Fasten (2) 1-1/2" (38mm), #8 wood screws to the wall using the markings placed in Step 1 as your guide. Leave a 3/16" (5mm) space between the wall and screwhead. If a wall stud is not available, use an appropriate anchor. Step 3. Attach speaker wire, as shown on page 4. Step 4. Place the speaker on the wall by aligning the upper two keyholes on the back of the speaker to the screwheads on the wall. Once positioned properly, the speaker should slide down slightly and become secure. IMPORTANT NOTE: The set of drivers closer to the monopole setting indicator in Figure 3 should be installed toward the front of the room. It does not matter whether or not the tweeter is positioned above or below the woofer.This will ensure proper operation and performance should the Monopole or Dipole position on the surround mode configuration switch be selected.
BETA ES250
5
|
|
|
> |
|