|
|
|
Categories
|
|
Information
|
|
Featured Product
|
|
|
 |
|
|
There are currently no product reviews.
 ;
A site where discontinualed schematic diagrams and back dated information can be found on discontinued radios tv's and any electronic equipment can be found. Newer manuals either Service and operating manuals. Radio amateurs should find this site a great source for ham radio equipment manuals. I will return to this site should I need information on any electrical equipment. priced easy to download in a PDF format and print pages need to undertake the repair.
;
Quality scan of the original. All the detail necessary to troubleshoot, repair and adjust the unit. I'm sure I will be downloading more manuals in the future as the need arises.
;
Exactly as described, a Service Manual complete with the schematics and PCB layout delivered in a timely manner. Many thanks for the great service.
 ;
some of the writing is a bit blur but the part in the schmatic was great and i have fixed the machine thanks
;
Well.. I'd searched for this manual and although I found many copies online I was pleased to find your website with a well balanced pricing system and easy to search and follow links. That together with the very quick response time was just what I was looking for.. being a very impatient tech.. ;-) I had the service manual in front of me within a short time.
Bookmarked.. and you can bet I will always come here first for my service & user manuals..
best regards
Ed(Tony) Foley
G7WHK
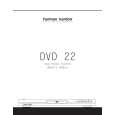
DVD22
harman/kardon
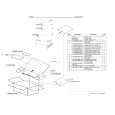
FRONT-PANEL CONTROLS
NOTE: To make it easier to follow the instructions that refer to the controls and connectors in this illustration, a larger copy may be downloaded from the Product Support section for this product at www.harmankardon.com.
0 Power Indicator 1 Power On/Off (Standby) 2 Play 3 Pause 1 Power Indicator: This indicator lights amber when the unit is connected to an AC power source, but is not turned on. When the unit is on, the indicator lights blue. 1 Power On/Off (Standby): Press the button once to turn the DVD 22 on. Press it again to put the unit in the Standby mode. Note that in order for this switch to operate, the Main Power Switch 0 must be pressed in so that it is in the ON position. 2 Play: Press to initiate playback or to resume playback after the Pause Button 4C has been pressed. 3 Pause: Press this button to momentarily pause playback. To resume playback, press the button again. If a DVD is playing, action will freeze and a still picture will be displayed when the button is pressed. 4 Stop: Press this button once to place the disc in the Resume mode, which means that playback will stop, but as long as the tray is not opened or the disc changed, DVD playback will continue from the same point on the disc when the Play Button 2G is pressed again. Resume will also work if the unit was turned off. To stop a disc and have play start from the beginning, press the button twice.
4 Stop 5 Skip/Search Reverse 6 Skip/Search Forward 7 Remote Sensor 6 Skip/Search Reverse: Press this button once to return to the start of the current chapter for a DVD or track for a CD. Subsequent individual presses will skip backwards through the available chapters or tracks. Press and hold the button to play the disc in the fast reverse mode at the speed indicated in the on-screen display and by the Playback Mode Indicators K. 7 Skip/Search Forward: Press this button once to move to the start of the next chapter for a DVD or track for a CD. Subsequent presses will skip forward through the available chapters or tracks. Press and hold the button to play the disc in the Fast Play mode at the speed indicated in the on-screen display and by the Playback Mode Indicators K. 8 Remote Sensor: The sensor that receives commands from the remote control is behind the front panel in this area. To ensure proper operation of the player with the remote, it is important that this area not be covered. In the event that the player is enclosed in a cabinet or if the remote sensor is covered, you may extend the remote sensor by connecting an optional, external remote sensor to the Remote Control Input � on the rear panel (see page 11). When optional, external IR �blasters� are used for system control, they should be positioned so that they point at this area.
8 Display 9 Disc Drawer ! Open/Close @ Information Display 8 Display: Press this button to reduce the brightness of the Information Display by 50% or to turn the display off completely in the following order: FULL BRIGHTNESS � HALF BRIGHTNESS � OFF � FULL BRIGHTNESS. ) Disc Drawer: This drawer is used to hold the discs played in the unit. Be certain to seat all discs carefully within the recess in the drawer. Do not press down on the drawer when it is open, to avoid damage to the player. ! Open/Close: Press this button to open or close the disc tray. @ Information Display: The Information Display provides status information on the player and the disc being played through a series of specific indicators and messages that appear in the dot matrix display. See page xx for more information on the display.
6
FRONT-PANEL CONTROLS
7
|
|
|
> |
|