|
|
|
Categories
|
|
Information
|
|
Featured Product
|
|
|
 |
|
|
There are currently no product reviews.
 ;
Hello from Germany - thank you very much for the manual for my Sharp "Searcher" - the handling of your internet area is outstanding..Mike
;
I am very happy with the owner's manual. I bought a used Casio and was so relieved that I was able to get a hold of a owner's manual. It was very easy to download the manual and I had no problems with printing it. Thank you! Nancy Whalen
;
The purchased manual is an high-quality scan of the original JVC paper-based Owner´s Manual. I am very satisfied!
;
Very satisfied with received document, all is right, Thank You very much, it was a Pleasure to work with You.
 ;
great site, the most easy and fastest way to find the manual you need, no 5 star because the manual was only available in german, but I speak german as well so no problem for me.
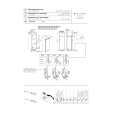
USING
THE
S-VIDEO INPUT JACKS
T
he S(uper)-Video connection on the rear of the TV can provide you with better picture detail and clarity for the playback of accessory sources such as DBS (digital broadcast satellite), DVD (digital video discs), video games, and S-VHS VCR (video cassette recorder) tapes than the normal antenna picture connections. NOTE: The accessory device must have an S-VIDEO OUT(put) jack in order for you to complete the connection on this page.
NOTE: Repeatedly pressing the AV button on the remote control will toggle the picture source from the current channel, then the AV1 channel (or CVI channel), then the AV2 channel, then the S-Video (SVHS) channel, then the Front channel (side inputs), then back to the current channel being watched.
AV2 CVI
1 2 3 4 5 6 7
Connect one end of the S-VIDEO CABLE to the S-VIDEO jack on the back of the TV.
AV1
Monitor out
2
AV1 in
AV2 in
1
S-VIDEO
VIDEO
24
Y L/Mono
Front
AUDIO
Pb
Connect one end the AUDIO (red and white) CABLES to the AV2 in AUDIO L and R(left and right) jacks on the rear of the TV. Connect other end of the S-VIDEO CABLE to the S-VIDEO OUT jack on the back of the VCR. Then connect the other ends of the AUDIO (red and white) CABLES to the AUDIO (left and right) OUT jacks on the rear of the VCR. Turn the VCR and the TV ON. Press the AV button on the remote to scroll the channels until SVHS appears in the upper left corner of the TV screen. Now your ready to place a prerecorded video tape in the VCR and press the PLAY button on the VCR.
SVHS
R
Pr COMPONENT VIDEO INPUT
AUDIO CABLE (RED/WHITE) S-VIDEO CABLE
L
R
VIDEO OUT
S-VIDEO OUT
ANT/CABLE OUT
AUDIO OUT
4 6
VOL
BACK OF VCR
3
5
VCR (EQUIPPED WITH S-VIDEO JACKS)
7
HELPFUL HINT
The S-VIDEO and VIDEO AV2 in(puts) are in parallel. The S-VIDEO input is dominant when in use. If separate video signals are connected to the S-VIDEO and VIDEO AV2 in(puts), the signal from the VIDEO AV2 in(put) will not be usable. Note: The S-Video and Audio cables needed for this connection are not supplied with your TV. Please contact your dealer or Philips at 800-531-0039 for information about purchasing the needed cables.
10
|
|
|
> |
|