|
There are currently no product reviews.
 ;
I've looked some time for this manual, you guys had it and to a good price. A++++
 ;
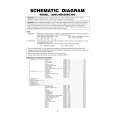
factory technician level - complete with board views :
( removing chassis from cabinet , only thing missing ) ;
on weekends , staff is not available so - be patient .
;
Good complete Service-Manual (SONY PVM6041QM)
A few graphics and waveforms not very clear! (-1*)
;
Excellent manual. In addition to the information I needed was a complete description of both electronic and mechanical devices.
Excellent site.
Thank you very much.
;
very good and complete manual , it is in english and german is perfect for repair.
11. Removing the chassis frame
1) Remove the back cover. (Refer to Item 1.) 2) Remove the speakers. (Refer to Item 2.) 3) Remove the top shield bracket. (Refer to Item 3.) 4) Remove Power Module unit. (Refer to Item 4.) 5) Remove the Scaler board. (Refer to Item 5.) 6) Remove the D-Rewrite board and bracket. (Refer to Item 6.) 7) Remove the back plate. (Refer to Item 7.) 8) Remove the TU/AOUT, AV2 and Signal boards. (Refer to Item 8.) 9) Remove the Front/AV board. (Refer to Item 9.) 10) Remove the Power SW and LED/RMT boards. (Refer to Item 10.) 11) Remove 2 screws (PP 3x6), then remove the cord holder. 12) Remove 4 screws (PP 3x6), then remove 2 fan bracket holders. 13) Remove 4 screws (PP 3x20), then remove the 2 DC fans. 14) Remove 10 screws (PBI 4x12) and 8screws (PP 4x10), then remove the chassis frame.
PP 3x6 Fan bracket holder PP 3x6 DC Fan
PP 3x20 PBI 4x12 PP 3x20 PP 4x10 PP 3x6 PP 4x10 PBI 4x12
Chassis frame
� 27 �
|