|
|
|
Categories
|
|
Information
|
|
Featured Product
|
|
|
 |
|
|
There are currently no product reviews.
 ;
Great service. The manual was exactly what I was looking for: schematic + layout. I managed to fix the player. Highly recommended!
 ;
At $5,00 certainly good bang for your buck. Includes electric schematics as well as exploded parts view + parts list for reordering. Unfortunately no details on the PCB contents or working, but then again, this is not overly complex. Best bonus: this manual does contain the heavily searched for LED error codes as well as descriptions for test operation. Haven't gotten around to fixing the machine yet, one thing the manual won't do for you is getting it out of the kitchen assembly :-(
;
It`s not your fault tear down is rather incomplete. It doesn`t have complete instructions as to deconstruction for repair.
;
THANK YOU FOR A GOOD TRANSACTION, NICE COPY, CLEAR
;
Very Good! All the diagram are easy to read, and its complete.
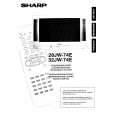
28JW-74E
� Use the channel up and down buttons to move between the options. � Use the volume control buttons to change the data. � To store the data, use the stand-by button on the remote control. � To exit the Service Mode, turn the receiver off using the mains switch. When the Service Mode is entered the following On Screen Display appears: SERVICE SOFTWARE 28JW74E ��-����� SW on: XXXX SW off: XXXX Hours ON: XXXX The figures displayed in the �XXXX� locations are hexadecimal representations of the number of times that particular function has been executed. For example if the hexadecimal number displayed after �SW ON� was 0E4A, this would correspond to the receiver being turned on 3658 times. X
Adjustment menu:
The following adjustments can be carried out in the Service Mode. 01. Horizontal Shift 02. East West Width 03. Pin Phase 04. Pin Amp 05. Upper corner correction 06. Lower corner correction 07. Extreme Corner Correction 08. Vertical Linearity 09. Vertical Angle 10. Vertical Bow 11. Vertical Amplitude 12. S Correction 13. Vertical Shift 14. Red Cut Off 15. Green Cut Off 16. Blue Cut Off 17. Alter NVM Pag (Page) 18. Alter NVM Pos (Position) 19. Alter NVM Val (Value) 20. Teletext Mix Mode Contrast 21. Teletext Contrast 22. OSD Contrast 23. DVCO Adjustment (Only PAL) 24. DVCO Adjustment (Only NTSC) 25. AGC Adjustment 26. Auto Installation On/Off
When in the Service Mode it is possible to access certain functions by using the teletext keys as below. � By pressing the Blue button each adjustment can be directly accessed via the remote control. Referring to the list above, press the Blue button followed by the adjustment number, this will directly access the selected adjustment. If any number above 26 is selected, the set will revert to the Service Mode entry page. To access a number less than 10, use the 0 key first, i.e. 02. � Press the Yellow button to go straight to the AGC adjustment. � Press the Green button once to enter �FACTORY VOLUME� level. Use volume control keys to change the setting. The original value will be recovered after resetting the TV set. � Press the Green button twice to enter �FACTORY BALANCE� level. Use volume control keys to change the setting. The original value will be recovered after resetting the TV set. � Press the Red button once to enter �FACTORY CONTRAST� level. Use volume control keys to change the setting. The adjustment is stored automatically. � Press the Red button twice to enter �FACTORY BRIGHTNESS� level. Use volume control keys to change the setting. The adjustment is stored automatically. � Press the Red button three times to enter �FACTORY COLOUR� level. Use volume control keys to change the setting. The adjustment is stored automatically. � If buttons 0 through 9 are pressed, the set will automatically go to that program number. Note that in case the blue button has been used before, the program number should be requested by using two digit number (01...99). � By pressing the Menu button, the unit will normalise Picture and Audio settings. The Auto Installation is then turned �on�.
7
|
|
|
> |
|