Shopping cart is empty
 
English Polski Spanish 
Search For a Manual
 

(e.g. AA-V20EG JVC, ZX-7 Sony )
PayPal 1000+ rating Secure, Encrypted Checkout.
 
Support Info
ELECTROLUX
First point of contact:
All trademarks are the property of their respective owners
Categories
Information
Featured Product
Home >> AEG >> 3010D-M Owner's Manual
 
 0 item(s) in your cart 

AEG 3010D-M
Owner's Manual


Tweet about this product and get $1.00 of store credit for instant use!
  • Download
  • PDF Format
  • Complete manual
  • Language: English, German, French, Dutch
Price: $4.99

Description of AEG 3010D-M Owner's Manual

Complete owner's manual in digital format. The manual will be available for download as PDF file after You purchase it.

Owner's Manual ( sometimes referred to as User's Guide or User's Manual ) contains information on how to use Your device. After placing order we'll send You download instructions on Your email address.

The manual is available in languages: English, German, French, Dutch

Not yet ready
You must purchase it first

Customer Reviews
There are currently no product reviews.
Other Reviews
 PE1644 PHILIPS Owner's Manual by Thijs Werkman;
This manual is very helpfull to use the Power Supply. All technical information has been available. For service use the circuit diagrams are very good. Thanks .
 SATELLIT 2100 GRUNDIG Owner's Manual by Jean-Robert LAROCHE;
Very comprehensive document which is a must-have for any Satellit 2100 owner whose set up is somewhat intricate. Due to the bad quality of the pictures that are rather dark and a bit blurred I gave 4-star feedback.
 SA-GX505 TECHNICS Owner's Manual by David Salars;
The manual was missing 2 pages but when I presented the problem to the company they made every attempt to get the 2 pages to me, when they couldn't they refunded my money. A very pleasing and easy transaction. The manual they provided was the original, it was concise and to the point. I plan to do business with this company again when should the need arise.
 CT-W502R PIONEER Owner's Manual by tom dolfin;
The owners manual is very good. all my how to questions were answered in detail.
 MXP-S390 SONY Owner's Manual by Attila Nagy;
Irrespectively of this manual exist only germany language, it's useful - although i need some additional task to translate: My english is bad, but usable - but i really dont speak germany. :)

Text excerpt from page 19 (click to view)
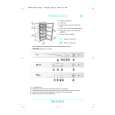
Montage - Bild 8
� Den Rahmen zur Aufnahme der Schalter, Fettfilter und Lampen auf den entsprechenden Führungen in den Motorraum einfügen und mit den beiden Schrauben 3x9 fixieren (1-2-3). � Mittellinie an der Wand kennzeichnen, um das Montageverfahren zu erleichtern (4); dann die Montageschablone so positionieren, dass ihre Mittellinie mit der zuvor an der Wand gekennzeichneten Linie bzw. die Schablonenunterseite mit der Unterseite der montierten Haube übereinstimmt (5). � Zwei Löcher � 8 mm bohren und die Montageschiene mit Mauerdübeln und zwei Schrauben fixieren (6). � Die Haube aufhängen (7), ausrichten (8-9) und vom Haubeninneren her einen Punkt zum definitiven Fixieren der Haube (10) kennzeichnen. Die Haube abnehmen und ein Loch � 8 mm bohren (11); dann einen Mauerdübel einfügen und die Haube definitiv mit einer Schraube fixieren (12). � Zwei Löcher � 8 mm in Deckennähe bohren (13), zwei Mauerdübel einfügen und den Kaminhalter mit zwei Schrauben fixieren (14). Wird die Haube mit Umluftbetrieb verwendet, muss Umluftweiche F mit vier Schrauben 2,9x6,5 am Kaminhalter montiert werden; dann das Abluftrohr einfügen (15), um die Umluftweiche mit dem Luftaustritt D der Haube zu verbinden. Arbeitet die Haube mit Abluftbetrieb, darf die Umluftweiche nicht montiert werden; in diesem Fall ist ein Abluftrohr (15) zwischen Au�enrohrleitung und Luftaustritt der Haube D einzufügen. � Den Elektroanschluss vorbereiten (16), die Haube jedoch noch nicht ans Netz anschlie�en. � Die Lampen und das Bedienfeld im Motorraum anschlie�en (17). � Den Wrasenschirm in den Motorraum einfügen und mit vier Schrauben M4x35 (18) fixieren. Das Modell 3010D verfügt über ein zusätzliches Element, das am ersten Element, das an Punkt 18 fixiert ist, montiert wird (vor oder nach dem Punkt); die beiden Elemente werden mittels vier Schrauben fixiert. � Den Kamin zuerst oben (19a) an der Kaminhalterung (19b) und dann unten (20a) an der Rahmenoberseite (20b) fixieren und mit vier Schrauben 2,9x6,5 verbinden. � Die Haube ans Netz anschlie�en und prüfen, ob sie ordnungsgemä� funktioniert.

19

You might also want to buy

$4.99

SX-K700 TECHNICS
Owner's Manual

Complete owner's manual in digital format. The manual will be available for download as PDF file aft…

$4.99

CJ-V51 PIONEER
Service Manual

Complete service manual in digital format (PDF File). Service manuals usually contains circuit diagr…

$4.99

GRAND PRIX ELECTRONIC 754 BECKER
Service Manual

Complete service manual in digital format (PDF File). Service manuals usually contains circuit diagr…

$4.99

SX-PR602 TECHNICS
Service Manual

Complete service manual in digital format (PDF File). Service manuals usually contains circuit diagr…

$4.99

EV-S1000E SONY
Owner's Manual

Complete owner's manual in digital format. The manual will be available for download as PDF file aft…

$4.99

GRAND PRIX ELECTRONIC 780 BECKER
Service Manual

Complete service manual in digital format (PDF File). Service manuals usually contains circuit diagr…

$4.99

AG7330 PANASONIC
Service Manual

Complete service manual in digital format (PDF File). Service manuals usually contains circuit diagr…

$4.99

MECABLITZ 60 CT4 METZ
Service Manual

Complete service manual in digital format (PDF File). Service manuals usually contains circuit diagr…
>
Parse Time: 0.964 - Number of Queries: 129 - Query Time: 0.329