|
|
|
Categories
|
|
Information
|
|
Featured Product
|
|
|
 |
|
|
There are currently no product reviews.
 ;
Nice manual. Clear copy and very rare, to boot. Great price, too!
 ;
Excellent service manual. Complete service info. with schematics, step-by-step instructions and illustrations. Well worth the price!
;
Great product, helped me to restore vintage walkman cassette.
Just some pictures could be little bit more sharp and contrast
Thank you
;
I love older radio's and the service manuals that are sometimes hard to find. Was able to find a manual quite easily on this site.
;
Thank you for your shop manual! Your help was very useful - the device is repaired! Once again - Thank you! I wish you a successful business! Edward (Russia).
WARNING: BEFORE SERVICING THIS CHASSIS, READ THE �X-RAY RADIATION PRECAUTION�, �SAFETY PRECAUTION� AND �PRODUCT SAFETY NOTICE� ON PAGE 3 OF THIS MANUAL.
SET-UP ADJUSTMENT
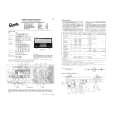
â� The following adjustments should be made when a complete realignment is required or a new picture tube is installed. Perform the adjustments in order as follows : 1. Color Purity 2. Convergence 3. White Balance Note: The PURITY/CONVERGENCE MAGNET assembly and rubber wedges need mechanical positioning. Refer to figure 1. Mounting position of the purity magnet assembly should fit to same position as old one because slightly difference to the position depend on a kind of tube.
*
There are no adjustment of purity and convergence in some picture tube (Unified with purity magnet) 5. Remove the Rubber Wedges. 6. Rotate and spread the tabs of the purity magnet (See figure 2.) around the neck of the picture tube until the green belt is in the center of the screen. At the same time, enter the raster vertically. 7. Slowly move the yoke forward or backward until a uniform green screen is obtained. Tighten the clamp screw of the yoke temporarily. 8. Check the purity of the red and blue raster.
SPECIFIC INFORMATIONS GENERAL ADJUSTMENTS
COLOR PURITY ADJUSTMENT NOTE : Before attempting any purity adjustments, the receiver should be operated for at least fifteen minutes. 1. Demagnetize the picture tube and cabinet using a degaussing coil. 2. Set the brightness and contrast to maximum. 3. Use a green raster from among the built-in test signals. 4. Loosen the clamp screw holding the yoke and slide the yoke backward or forward to provide vertical green belt (zone) in the picture screen.
DEFLECTION YOKE
TEMPORARY MOUNTING
29.1mm(28", 29") 25mm(25") 19mm(19", 20", 21") 14mm(13", 14")
RUBBER WEDGE
ADHESIVE PURITY/ CONVERGENCE MAGNET ASS'Y
DEFLECTION YOKE
GLASS CLOTH TAPES
Figure 1.
�4�
|
|
|
> |
|