|
|
|
Categories
|
|
Information
|
|
Featured Product
|
|
|
 |
|
|
There are currently no product reviews.
 ;
Very good copy of Manual, clear and easy to print off, arrived very promptly and reasonably priced.
Thanks, I will use you again.
;
Zeer duidelijke afdrukken op A4-formaat , zeer uitgebreide handleiding . Pluspunt ,zeer snelle
respons van jullie , binnen de 24h . Top !!!
;
I AM HIGHLY IMPRESSED BY THE EASE OF USE OF THIS DOWNLOAD SERVICE. INSTRUCTIONS ARE CLEAR AND SIMPLE TO FOLLOW....EVEN BY TECHNOPHOBES SUCH AS MYSELF. THE EMAILS POINT YOU IN THE RIGHT DIRECTION...ITS SO EASY PEASY. THE DOWNLOAD CHOICE OF USER MANUALS IS EXTENSIVE AND I COULD NOT FIND A CHEAPER OR MORE EFFICIENT SERVICE ON THE INTERNET. I COULD NOT HAVE MADE A BETTER CHOICE OF INFORMATION PROVIDER. SHOULD I EVER NEED ANOTHER USER MANUAL, THEN THIS IS THE FIRST CHOICE SITE. COULD NOT BE BETTER PLEASED!!!!!!!...MANY THANXES FROM JIM BURNS
;
I was impressed with the quality of service (frequent e-mails to let you know the status of your order), and the speed at which the download became available. The manual was a life saver and was not easy to track down. Thank you for such an excellent service.
;
the manual was just what i wanted it had all the revelent information required to operate the hifi .Iwould use any manual i downloaded for any item which needs a manual
DRYER CARE
As needed cleaning
Cleaning the Dryer Location
Keep dryer area clear and free from items that would obstruct the flow of combustion and ventilation air.
WARNING
Laundry detergent and fabric softener residue can build up on the lint screen. This buildup can cause longer drying times for your clothes, or cause the dryer to stop before your load is completely dry. The screen is probably clogged if lint falls off the screen. Clean the lint screen with a nylon brush every 6 months, or more frequently if it becomes clogged due to a residue buildup.
To wash
1. Roll lint off filter using your fingers. 2. Wet both sides of lint screen with hot water. 3. Wet a nylon brush with hot water and liquid detergent. Scrub lint screen with the brush to remove residue buildup.
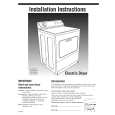
Explosion Hazard Keep flammable materials and vapors, such as gasoline, away from dryer. Place dryer at least 46 cm (18 inches) above the floor for a garage installation. Failure to do so can result in death, explosion, or fire.
4. Rinse screen with hot water. 5. Thoroughly dry lint screen with a clean towel. Insert lint screen back into dryer.
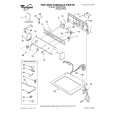
Cleaning the Lint Screen
Every load cleaning
The lint screen is located in the door of the dryer. Clean the lint screen before each load. A screen blocked by lint can increase drying time. To clean 1. Pull the lint screen toward you. Roll lint off the screen with your fingers. Do not rinse or wash screen to remove lint. Wet lint is hard to remove.
Cleaning the Dryer Interior
To clean dryer drum
1. Make a paste with powdered laundry detergent and very warm water. 2. Apply paste to a soft cloth. OR Apply a liquid, nonflammable household cleaner to the stained area and rub with a soft cloth until all excess dye is removed. 3. Wipe drum thoroughly with a damp cloth. 4. Tumble a load of clean cloths or towels to dry drum. NOTE: Garments that contain unstable dyes, such as denim blue jeans or brightly colored cotton items, may discolor the dryer interior. These stains are not harmful to your dryer and will not stain future loads of clothes. Dry unstable dye items inside out to prevent dye transfer.
2. Push the lint screen firmly back into place. IMPORTANT: s Do not run the dryer with the lint screen loose, damaged, blocked, or missing. Doing so can cause overheating and damage to both the dryer and fabrics.
s
Removing Accumulated Lint
From Inside the Dryer Cabinet
Lint should be removed every 2 years, or more often, depending on dryer usage. Cleaning should be done by a qualified person.
If lint falls off the screen into the dryer during removal, check the exhaust hood and remove the lint. See �Checking Your Vent.�
From Inside the Exhaust Vent
Lint should be removed every 2 years, or more often, depending on dryer usage. If you have any questions or comments, please call a designated Whirlpool service company.
9
|
|
|
> |
|