|
|
|
Categories
|
|
Information
|
|
Featured Product
|
|
|
 |
|
|
There are currently no product reviews.
 ;
manual was very helpful in learning how to propery use my washer. I could not find this manual anywhere else.
 ;
Awesome quality manual. You really saved my bacon with this one. Was looking for some specific information with regards to my "new" vintage VCR that didn't come with the owners manual. This site is truely a goldmine of available manuals. The quality of the scans are top notch.
Thank-you so much for this awesome manual. If you're looking for this Sony SL-HF400 owners manual, this is the one you NEED to buy. Definitely worth the money.
;
The manual was made available promptly. I is a clean scan of the original. I had no problem downloading it. The scan was well centered and cleanly formatted. It is as good a product as can be had without being the original document.
;
Received downlink in less then 8 hours, Item was in good copy condition, and told me how to program the clock timer. The price was very resonable, and the process was very automated and was GREAT to work with.
;
Fast service, document is OK. Thanks! Searched for it long time.
4. Replace meat drawer.
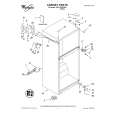
Crisper and Crisper Cover
(on some models)
To remove the crisper(s): 1. Slide crisper(s) straight out to the stop. 2. Lift the front. 3. Slide out the rest of the way. 4. Replace the crisper(s) in reverse order. Style 1 Style 2 To remove the cover: Remove meat drawer. 1. Remove meat drawer. 2. Take the half width cover with both hands, lift up the shelf side resting on the side wall of the refrigerator. 3. Turn the cover toward the opposite side wall. 4. Tilt the cover up at front, then tilt cover up at back until rear hook is out of the center shelf support and pull cover toward you. To replace the cover: 1. Guide the rear cover hooks into the slot of the center support. 2. Tilt the front of the cover up until rear hook drops into slot. Rest cover on side wall. Make sure shelf is firmly supported. Style 2 To remove the glass cover: 1. Pull the glass straight out. 2. Replace in reverse order. To remove the plastic cover: 1. Remove crisper(s). 2. Lift cover front and remove the cover support. 3. Lift cover up and slide out.
1. Lock 2. Center support 3. Slot
13
|
|
|
> |
|