|
|
|
Categories
|
|
Information
|
|
Featured Product
|
|
|
 |
|
|
There are currently no product reviews.
 ;
Very good reproduction (copy) of original manual. Didn't have a parts list, but schematic was completely labeled with parts. Complete instructions on how to adjust mechanical functions of the 8-track deck. Well worth having and at a very reasonable cost.
;
It's a full manual. All the parts are in there. I haven't found the problem yett, but I am working on it; hope I can rebuild the part myself. To make it more secure and unbreakable this time. Because the part has failed several times before and costs a lot to let it be repaired.
Thanks so much for this rich illustrated and parted manual.
;
I downloaded the document. The manual was complete, well scanned and everything was legible. I could zoom in see what I needed to know. There's not much more that you can ask.
;
It was complete service manual with all needed service informations. Thanks.
 ;
El manual esta muy detallado, los numeros de partes y los esquemas de despiece son correctísimos y muy claros, tanto para los técnicos experimentados como para los novatos.
Reference Notes in the Table
Caution ! When removing the CRT, be sure to discharge the Anode Lead of the CRT with the CRT Ground Wire before removing the Anode Cap. CAUTION 1: Discharge the Anode Lead of the CRT with the CRT Ground Wire before removing the Anode Cap.
1. Disconnect the following: Anode Cap, CN501A, CRT CBA, CN571, CN602, CN702, and CN1501. Then remove Tray Chassis Unit. 2. Remove three screws (S-15) and remove the Top Shield. Remove screws 7(S-16), (S-17) and (S-18). Then, desolder connectors (CN201, CN202, CN203, CN204) and lift up the Deck Assembly.
(S-1) (S-1) (S-1)
(S-2) (S-1) (S-2) (S-1)
(S-1)
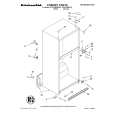
[1] Rear Cabinet
Fig. 1
(S-3)
Anode Cap CRT CBA
(S-3)
(S-3)
[3] CRT
(S-3)
Fig. 2
1-6-2
T2021DC
|
|
|
> |
|