|
|
|
Categories
|
|
Information
|
|
Featured Product
|
|
|
 |
|
|
There are currently no product reviews.
 ;
It`s full copy of a service manual from url http://www.philips.owner-manuals.com/PM3216-service-manual-PHILIPS.html
 ;
perfect! you just sent to me the copy in Italian witout even my specification!!!! so you are really smart cooperative and efficient. To my opinion the best place all over to get a manual of electronics!!!!
;
Well Well Well!!!! Good manual perfect for my hobby!!! As Before you have done a very well done work!!!! Thank you
;
Super nice! Good to have a manual in digital format.
;
Great job supplying the manual.
Many of these products weerepretty obscure, so it was great that you had
the manual for it!
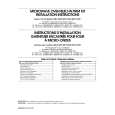
TOP VIEW
1.
Wheel must be mounted with a minimum of 5/16" clearance to scroll sides. Apply grease to motor shaft before assembling wheel. Torque set screw on flat of shaft to 110 #10 in. lbs.
2. 3.
10. OUTDOOR BLOWER MOTOR REMOVAL
1. It will be necessary to remove the top panel of the unit. Remove 4 screws that attach scroll housing to basepan (See #1, Figure 9). 9. 3. 4. 5. Disconnect wiring from motor terminal block. 10. Remove scroll/motor assembly from the unit. Note: If at this point only the blower wheel needs replaced, then remove 4 screws from inboard venturi. Remove and replace blower wheel (see note) or else go to Step. 6. Disconnect wiring at capacitor. Upon reassembly, the references made on Figures 9 and 10 shall be used for proper reassembly. Remove blower wheel and motor mounting bracket. 7. 8. 2. Remove 4 screws from venturi (See #1, Figure 10). Remove 4 screws from motor mount bracket (See #2, Figure 10). Remove motor assembly from scroll.
6.
14
|
|
|
> |
|