|
|
|
Categories
|
|
Information
|
|
Featured Product
|
|
|
 |
|
|
There are currently no product reviews.
 ;
Turns out this was not the manual i was looking for. The concertmate 670 keyboard i have is a "Realistic" model made for Radio Shack and none of the diagrams on the owners manual i received matches up. HOWEVER, I must say the service Owners Manual provides was fast and efficient by being available online. The manual was in good readable condition and easily downloaded.
 ;
Great price, Quick delivery, the document was very usefull A+++++++++++++++
;
Thank´s for your help, I already recived these manual from you
;
Thank you for your manual It has the basic things to and i use the Oszi for Longer Time.
THX
;
Actually, I was looking for this information for 3 years!...now thanks to you, the manual is on my hands and of great help, cause I understand now where I was doing wrong connections and wires...excellent, I'll be back to you if in need, thank you.
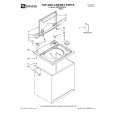
Level the Washer
Properly leveling your washer avoids excessive noise and vibration.
Install the Front Leveling Feet
1. Prop up the front of the washer about 10.2 cm (4") with a wood block or similar object. The block needs to support the weight of the washer.
Steps in Final Location
1. Slide the washer to its final location. 2. Tilt the washer forward until the rear of the washer is at least 10.2 cm (4") off the floor. You may hear the self-adjusting rear feet click into place. Lower the washer to the floor.
10.2 cm (4")
10.2 cm (4")
A
A
A. Self-adjusting feet
A. Threaded holes for feet
2. Screw the locknut onto each foot to within 2.5 cm (1") of the foot base.
3. Check the levelness of the washer by placing a level on the top edges of the washer, first side to side, then front to back.
2.5 cm (1")
3. Screw the feet into the threaded holes at the front corner of the washer until the nuts touch the washer. Twist the feet to install. NOTE: Do not tighten the nuts until the washer is level.
4. If the washer is not level, move the washer out slightly, tip back, prop up the front of the washer with the wood block and adjust the feet up or down as necessary by twisting the feet. Turn the feet clockwise to raise the washer or counterclockwise to lower the washer. Repeat steps 1 through 4 until washer is level.
4. Tilt the washer back and remove the wood block. Gently lower the washer to the floor.
9
|
|
|
> |
|