|
There are currently no product reviews.
 ;
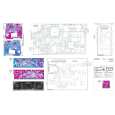
At $5,00 certainly good bang for your buck. Includes electric schematics as well as exploded parts view + parts list for reordering. Unfortunately no details on the PCB contents or working, but then again, this is not overly complex. Best bonus: this manual does contain the heavily searched for LED error codes as well as descriptions for test operation. Haven't gotten around to fixing the machine yet, one thing the manual won't do for you is getting it out of the kitchen assembly :-(
;
It`s not your fault tear down is rather incomplete. It doesn`t have complete instructions as to deconstruction for repair.
 ;
THANK YOU FOR A GOOD TRANSACTION, NICE COPY, CLEAR
;
Very Good! All the diagram are easy to read, and its complete.
;
This was an excellent source of detailed assembly information on a device which is at least 12 years old. A very lucky find, coupled with great service.
D
3.0 Com Port setzen
Um die Verbindung zwischen Interface und PC herzustellen müssen Sie nun Ihren PC auf die richtige Eingangsbuchse stellen (Com Port). Bitte starten Sie den Comserver mit einem Doppelklick der Maus auf das Icon "ComServ".
GB
3.0 Setting the Com port
To provide a connection between the interface and the PC, you must now set the correct communication port.
1.
1.
2.
2.
Double-click the "ComServ" icon to start the ComServer.
3.
In der oberen Menuebake des ComServers müssen Sie den Punkt "Konfiguration" + "Schnittstellen" auswählen.
3.
Choose the item "Schnittstellen" (interface) from the "Konfiguration" menu.
4.
Stellen Sie nun die von Ihnen gewünschte Schnittstelle (V24 Port) ein und bestätigen mit "OK". Danach speichern Sie die Einstellungen.
4.
Then set the desired interfaces (V24 port) and confirm with "OK". Click "OK" to store your settings.
-6-
|