|
|
|
Categories
|
|
Information
|
|
Featured Product
|
|
|
 |
|
|
There are currently no product reviews.
 ;
Excellent printing quality.
A complete and very usefull service manual with all details.
GREAT SERVICE AT VERY LOW PRICE!
A+++++++++++++++++++++++++
;
Excellent printing quality.
A complete and very usefull service manual with all details.
GREAT SERVICE AT VERY LOW PRICE!
A+++++++++++++++++++++++++
;
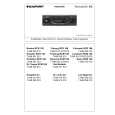
SATELLIT 4000 GRUNDIG
Service Manual
high quality. good graphics. prompt service.
;
Excellent printing quality.
A complete and very usefull service manual with all details.
GREAT SERVICE AT VERY LOW PRICE!
A+++++++++++++++++++++++++
;
Excellent printing quality.
A complete and very usefull service manual with all details.
GREAT SERVICE AT VERY LOW PRICE!
A+++++++++++++++++++++++++
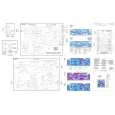
D
Demontage
GB
Disassembly
Demontageschritte Disassembly steps
Entfernen, entriegeln, abziehen Remove, unlock, disconnect
Bemerkungen Remarks
Fig. Fig.
Frontblende (F), Front Panel (F)
Release Panel Release Panel
abnehmen remove
Schrauben (2xE) Screws (2xE)
abschrauben unscrew
1
Feder (2xD) Spring (2xD)
entfernen remove
1
Rahmen (B) Frame (B)
Rahmen vorsichtig abziehen. Carefully remove the Frame.
1+2
Schrauben (4xG) Screws (4xG)
abschrauben unscrew
2
Frontblende (F) Front panel (F)
Frontblende vorsichtig abziehen. Carefully remove the front panel.
Laufwerk (C), Mechanism (C) (ADC 1400 + TN 705)
Schrauben (4xA) Screws (4xA)
abschrauben unscrew
3
X 1110 + X 1302 X 1110 + X 1302
vorsichtig abziehen carefully unplug
3
Laufwerk (C) Mechanism (C)
Laufwerk vorsichtig nach oben abheben. Carefully lift out the mechanism.
3
Laufwerk (K), Mechanism (K) (TN 708)
Schrauben (4xA) Screws (4xA)
abschrauben unscrew
4
Laufwerk (K) Mechanism (K)
Laufwerk vorsichtig nach oben abheben. Carefully lift out the mechanism.
4
X 1301 X 1301
vorsichtig abziehen carefully unplug
5
-6-
|
|
|
> |
|