|
|
|
Categories
|
|
Information
|
|
Featured Product
|
|
|
 |
|
|
There are currently no product reviews.
 ;
Super nice! Good to have a manual in digital format.
;
Great job supplying the manual.
Many of these products weerepretty obscure, so it was great that you had
the manual for it!
;
Great manual, would not have been able to operate my machine without it!!
James Dawson August 18, 2012
;
excellent value & price! Includes everything you need to know about the NN-C777! I would buy this again.
;
Very satisfied! I was searching for several days, but nope; till I discovered your webside and there it was at a very reasonable price. Keep up the good work!
Paul
Flanders
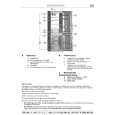
Aufstellen
8mm
Ha Hb Hb Abb. 12
PR168
PR167
Abb. 14
Abb. 12: TŸr des GerŠtes und die des Mšbels um ca. 90¡ šffnen. WinkelstŸcke (Hb) auf die TŸrmitnehmer setzen (Ha). GerŠte- und MšbeltŸr aneinander halten und die Lšcher an der GerŠtetŸr markieren.
Abb. 14: WinkelstŸcke (Hb) wieder auf die TŸrmitnehmer (Ha) setzen und diese mit den beiliegenden Schrauben (I) fixieren. Zur eventuellen Ausrichtung der MšbeltŸr den Spielraum der Langlšcher benutzen. Nach Abschluss der Arbeiten das exakte Schlie§en der TŸren ŸberprŸfen. Achtung! Zwischen MšbeltŸr und Umbaumšbel einen ca. 2mm Luftspalt sicher stellen, damit die GerŠtetŸr einwandfrei schlie§en kann. Darauf achten, dass die GerŠtedichtung gut schlie§t (siehe Kapitel �GerŠtedichtung�).
8mm
K Ha
PR167
Abb. 13
Hb
Abb. 13: WinkelstŸcke (Hb) abnehmen. Befestigungslšcher mit Nagel (K) ankšrnen und durchstechen.
Hd
PR167/1
Abb. 15
Abb. 15: Die Abdeckung (Hd) in das WinkelstŸck (Hb) eindrŸcken, bis sie einrastet.
12
|
|
|
> |
|