|
There are currently no product reviews.
 ;
excellent quality, contains circuits and scan quality, 110 pages
;
It was easy done, and I got exactly what I was looking for.
;
The manuel was exactly what I needed and I received it promptly. Thanks
;
Thanks to Owner-Manuals.com! This manual was exactly what I needed. As Amana was purchased by Maytag and later by Whirlpool, there was no way to receive it from their websites. I was lucky to find this resource.
 ;
Great to be able to set channels again, on an old but stoll fine working TV
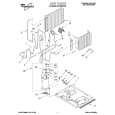
Installiation
procedure
C. Slide the chassis out of the cabinet.
1. Remove the front panel. Remove tape (if any). Lift panel and take it off the cabinet.
2. Remove the shipping brackets (2). Remove the cabinet ground screw (1) and disconnect the green and yellow grounding wire.
5. Install the drain plug and drain cup (accessory parts) to rear of cabinet. Slide drain cup down into rear support between grooves in cup. NOTE: Attach drain plug and drain cup assemblies and attach hose before sliding unit into cabinet.
3. Remove the rear shipping screws (2).
6. Fix the cabinet to the support frame
|