|
|
|
Categories
|
|
Information
|
|
Featured Product
|
|
|
 |
|
|
There are currently no product reviews.
 ;
Copy of genuine owners/operators manual, very useful
;
The manual was a perfect match and was exactly what I was looking for. I'm very satisfied with my purchase.
;
Thank you for having the manual I needed for an older model Aiwa stero I had found on Ebay --- I wanted the Aiwa because I had tapes and cd's but I did not have a manual as to how to operate the system... I found what I needed and it has enabled me to set the system up for my enjoyment.
;
I wished detailed information of the JBL S310 and here I found it! Very happy with the service from this site!
;
The manual was very helpfull, it answerdes all my questions, and i was surprized to find the original manual on this site! Big thumbs uP:)
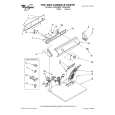
To reinstall shelf: 1. Hold shelf at front and back. 2. Tilt front of shelf up to a 45� angle to track. 3. Insert both rear shelf slides into upper channel of track. 4. Lower front of shelf to a level position. Make sure both rear shelf slides are securely in the track before letting go of shelf.
NOTE: Insert rear shelf slides into upper channel of track. /
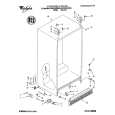
Removing
the crisper
and crisper
cover
Pull out to the stop, lift the front, and pull again.
To remove the crisper: Slide the crisper straight out to the 1. stop. 2. Lift the front slightly. 3. Slide out the rest of the way. 4. Replace in reverse order.
Style
I
To remove the cover: 1. Hold cover firmly with both hands and lift front of cover off supports. 2. Lift cover out by pulling up and out. To replace the cover: 1. Fit back of cover into notch supports on walls of refrigerator. 2. Lower front into place.
Lift the cover front, then the back.
Style
2
To remove the cover: 1. Push up glass insert from the bottom, then slide out with both hands. 2. Lift front of cover frame. 3. Lift cover frame up and out. To replace the cover: 1. Fit back of cover frame into notch supports on walls of refrigerator, then lower front into place. 2. Slide back of glass insert into place, then lower front into place.
13
|
|
|
> |
|