|
|
|
Categories
|
|
Information
|
|
Featured Product
|
|
|
 |
|
|
There are currently no product reviews.
 ;
I'm so glad I was able to find a site to download my missing manuals. Very reasonable prices and they kept me informed about the process and I had my manual within less than a day. The only thing I wish was an option is a 100% English version with no spanish or anything. But overall great site.
;
The manual is complete with excellent quality! One suggestion, show number of pages and weather it is multi-lingual. The AD 600 Manuel is about 76 pages and over half is non English. This results in a larger print job than usually needed. Having this information, one could select the desired pages for printing.
 ;
I've been looking for a copy of the original user/owner manual. Just what the doctor ordered, thank you.
;
the manual was very helpful thank you very much no one else was able to help me thanx
;
This is an excellent handbook. We had no information on the appliance until we obtained this and are now able to use the appliance to its full potential. Strongly recommended.
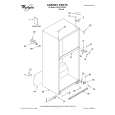
FREEZER FEATURES
Your model may have some or all of these features. Features that can be purchased separately as product accessories are labeled with the word �Accessory.� Not all accessories will fit all models. If you are interested in purchasing one of the accessories, please call the toll-free number on the cover or in the �Assistance or Service� section.
5. Replace �fences� by aligning pins with socket in the floor, and pushing down until they snap into place.
(on some models)
To Remove and Replace the Shelf:
1. Remove the shelf by lifting the entire shelf slightly and move it all the way to one side. Tilt the other side up and out of the shelf supports. 2. Replace the shelf by inserting one end all the way into the center of the shelf supports. Then, lower the other end of the shelf and insert it into the shelf supports. NOTE: The shelf should lower slightly and lock into place. If the shelf does not appear stable, make sure both ends of the shelf are inserted into the shelf supports.
Freezer Shelf
DOOR FEATURES
Your model may have some or all of these features. Features that can be purchased separately as product accessories are labeled with the word �Accessory.� Not all accessories will fit all models. If you are interested in purchasing one of the accessories, please call the toll-free number on the cover or in the �Assistance or Service� section.
Door Rails
The door rails may be removed for easier cleaning.
Snap-on Door Rails To Remove and Replace the Rails:
1. Remove the rails by pushing in slightly on the front of the bracket while pulling out on the inside tab. Repeat these steps for the other end of the rail. 2. Replace the rails by aligning the ends of the brackets with the buttons on the sides of the door liner. Firmly snap bracket and rail assembly onto the tabs above the shelf as shown.
Frozen Food Storage Guide
Storage times will vary according to the quality and type of food, the type of packaging or wrap used (should be airtight and moisture-proof), and the storage temperature. Seal the package or container securely to prevent taste and odor transfer throughout the product. Ice crystals inside a sealed package are normal. Put no more unfrozen food into the freezer than will freeze within 24 hours (no more than 2 to 3 lbs. of food per cubic foot [9071,350 g per 28 L] of freezer space). Leave enough space in the freezer for air to circulate around packages. The freezer door must close tightly. For more information on preparing food for freezing, check a freezer guide or reliable cookbook.
Drop-in Door Rails To Remove and Replace the Rails:
1. Remove the rails by pulling straight up on each end of the rail. 2. Replace the rails by sliding the shelf rail into the slots on the door and pushing the rail straight down until it stops.
Pull-out Freezer Floor
(on some models)
To Remove and Replace the Freezer Floor:
1. Lift both back �fences� up and out. 2. Remove the freezer floor by pulling it out about 1" (2.5 cm) with one hand around the air tower section (center back) and one hand at center front. 3. Lift up floor at rear until hooks release from cabinet and pull the floor out the rest of the way. 4. Replace the freezer floor by sliding the floor straight in until the hooks drop into place at rear of cabinet.
14
|
|
|
> |
|