|
|
|
Categories
|
|
Information
|
|
Featured Product
|
|
|
 |
|
|
There are currently no product reviews.
 ;
Hello from Germany - thank you very much for the manual for my Sharp "Searcher" - the handling of your internet area is outstanding..Mike
;
I am very happy with the owner's manual. I bought a used Casio and was so relieved that I was able to get a hold of a owner's manual. It was very easy to download the manual and I had no problems with printing it. Thank you! Nancy Whalen
;
The purchased manual is an high-quality scan of the original JVC paper-based Owner´s Manual. I am very satisfied!
;
Very satisfied with received document, all is right, Thank You very much, it was a Pleasure to work with You.
 ;
great site, the most easy and fastest way to find the manual you need, no 5 star because the manual was only available in german, but I speak german as well so no problem for me.
ADJUSTING THE CRISPER HUMIDITY
CONTROL (on some models)
You can control the amount of humidity in the moisturesealed crispers. Adjust the control to any setting between LOW and HIGH. � LOW (open) lets moist air out of the crisper for best storage of fruits and vegetables with skins. � HIGH (closed) keeps moist air in the crisper for best storage of fresh, leafy vegetables.
HIGH LOW
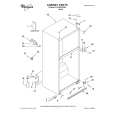
ADJUSTING THE FREEZER SHELF
(on some models)
Adjust the freezer shelf to match the way you use your freezer. To remove the shelf: (Style 1) 1. Lift entire shelf slightly. 2. Move shelf all the way to one side. 3. Tilt other side up and out of shelf support cups. 4. Pull shelf up and out. 2 3&4 To remove the shelf: (Style 2) 1. Remove items from the shelf. 2. Lift back of shelf over stop. 3. Slide shelf straight out.
1 To replace the shelf: To replace the shelf: 1. Slide back of shelf into shelf tracks on walls of cabinet. 2. Slide shelf in all the way.
1. Tilt the shelf and insert into freezer compartment. 2. Insert one end of the shelf all the way into the center
of the shelf support cups.
3. Lower other end of shelf and insert into the shelf
support cups. 4. Lower shelf into place. 3 1&2 4
NOTE: The shelf should lower slightly and lock into place. If the shelf does not appear sturdy, make sure both ends of the shelf are inserted into the shelf support cups.
17
|
|
|
> |
|