|
|
|
Categories
|
|
Information
|
|
Featured Product
|
|
|
 |
|
|
There are currently no product reviews.
 ;
manual de usuario perfecto y completo de buena calidad de impresion y muy detallado ideal !
 ;
It`s full copy of a service manual from url http://www.philips.owner-manuals.com/PM3216-service-manual-PHILIPS.html
;
perfect! you just sent to me the copy in Italian witout even my specification!!!! so you are really smart cooperative and efficient. To my opinion the best place all over to get a manual of electronics!!!!
;
Well Well Well!!!! Good manual perfect for my hobby!!! As Before you have done a very well done work!!!! Thank you
;
Super nice! Good to have a manual in digital format.
ADJUSTING THE CRISPER HUMIDITY
CONTROL (on some models)
You can control the amount of humidity in the moisturesealed crispers. Adjust the control to any setting between LOW and HIGH. � LOW (open) lets moist air out of the crisper for best storage of fruits and vegetables with skins. � HIGH (closed) keeps moist air in the crisper for best storage of fresh, leafy vegetables.
HIGH LOW
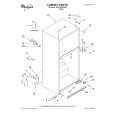
ADJUSTING THE FREEZER SHELF
(on some models)
Adjust the freezer shelf to match the way you use your freezer. To remove the shelf: (Style 1) 1. Lift entire shelf slightly. 2. Move shelf all the way to one side. 3. Tilt other side up and out of shelf support cups. 4. Pull shelf up and out. 2 3&4 To remove the shelf: (Style 2) 1. Remove items from the shelf. 2. Lift back of shelf over stop. 3. Slide shelf straight out.
1 To replace the shelf: To replace the shelf: 1. Slide back of shelf into shelf tracks on walls of cabinet. 2. Slide shelf in all the way.
1. Tilt the shelf and insert into freezer compartment. 2. Insert one end of the shelf all the way into the center
of the shelf support cups.
3. Lower other end of shelf and insert into the shelf
support cups. 4. Lower shelf into place. 3 1&2 4
NOTE: The shelf should lower slightly and lock into place. If the shelf does not appear sturdy, make sure both ends of the shelf are inserted into the shelf support cups.
17
|
|
|
> |
|