|
|
|
Categories
|
|
Information
|
|
Featured Product
|
|
|
 |
|
|
There are currently no product reviews.
 ;
A comprehensive Operating and Service Manual. All schematics are complete and easy to read. The PCB drawings and complete parts list are very helpful. I would definitely recommend this manual.
;
SCANNING OF HIGH QUALITY
VERY, VERY HIGH VELOCITY DOWNLOAD
VERY GOOD PRICE,
TRUE SATISFIED, THANKS
;
Genuine Toshiba owner's manual. Couldn't really ask for more. And written in understandable English in contrast to a few recent experiences I have had with manuals for other equipment other than Toshiba but made in China and written in "Chinglish"!
;
I purchased a vintage Sony mixer off eBay and within the hour was able to locate and purchase the manual for it.I mean really,where else can you find a manual for a product made in 1983!? It was easy to find and purchase/download the manual I needed.I will use this site again for other equipment I have! Great site!
;
manual de usuario perfecto y completo de buena calidad de impresion y muy detallado ideal !
7
l
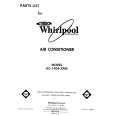
sizes. First, measure the distance from inside one window channel to the inside of the other channel and subtract X�. (See Figure 18 .) Now subtract the width of the air conditioner and divide by 2. This will give you the width to cut each filler board. Be sure to cut the filler ooard down the mid-section of its iongest measurement. Because the filler boards will be equal in width, they will automatically center your air conditioner in your window.
,Back
Measure and cut filler
board to proper
10
*Place cabinet
Fiaure 19
Ad
by turning cabinet to one side to get one filler board into window channel. Now maneuver other filler board into other window channel (see Figure 20 ). Reaching through window opening, push filler boards from outside as far toward you as they will go, Extend the mounting slides outward into the window channels on both sides. Pull the cabinet toward you to position the side mounting slides as far forward in the window channels as possible. Now mark and make a 3/32� pilot hole for each wood screw used to secure the slides in the window channels (see Figure 21). Be sure to use the foam blocks that are provided 20). CAUTION: BE SURE CABINET FALL OUT OF WINDOW. (see DOES Figure NOT
in window
I
LA<
BOARD
LEFT FILLER
I
Front
8
l
termine which will be your left and right filler boards. The holes on each board should align with the holes in the side mounting angles. Each filler board should also extend about %� above the top edge of the air conditioner cabinet. Now apply 3/8�-wide seal strips on the room side of each filler board as shown in Figure 19 (i.e. along the bottorn edge and window channel edge). Also place a seal strip along the top outside edge of each filler board. Now attach the filler boards to the side mounting angles with four, 3/8�, round headed sheet metai screws. Tighten the screws only loosely, so the filler boards can be moved back and forth.
Apply
seal strips and attach filler
boards. De-
9
. Insert
top mounting
side mounting
channel.
slides all the way
into
|
|
|
> |
|