|
|
|
Categories
|
|
Information
|
|
Featured Product
|
|
|
 |
|
|
There are currently no product reviews.
 ;
I'm so glad I was able to find a site to download my missing manuals. Very reasonable prices and they kept me informed about the process and I had my manual within less than a day. The only thing I wish was an option is a 100% English version with no spanish or anything. But overall great site.
;
The manual is complete with excellent quality! One suggestion, show number of pages and weather it is multi-lingual. The AD 600 Manuel is about 76 pages and over half is non English. This results in a larger print job than usually needed. Having this information, one could select the desired pages for printing.
 ;
I've been looking for a copy of the original user/owner manual. Just what the doctor ordered, thank you.
;
the manual was very helpful thank you very much no one else was able to help me thanx
;
This is an excellent handbook. We had no information on the appliance until we obtained this and are now able to use the appliance to its full potential. Strongly recommended.
move air around corners. Choose a window that�s also near an electrical outlet. (Refer to the ELECTRICAL REQUIREMENT pages for type of receptacle and wiring not use an extension which you place your have an opening of at and at least 20 inches needed.) Do cord. The window in air conditioner should least 26 inches in width in height (see Figure 4).
Standard installation parts are supplied for double-hung sash windows up to 54 inches in width.
. Attach seal strips to cabinet. Place 3/8� wide self-adhering seal strip on window side of bottom flange. Now, starting at the lower corner of the cabinet, apply 3/8�-wide seal strips over the center line of the pre-drilled holes for one of the side mounting angles, over the center line of pre-drilled holes for the top mounting channel, and over the center line of pre-drilled holes for the other side mounting angle. (See Figure 7.)
Figure 4
3
l
Remove front panel by pushing it down and pulling toward you (see Figure 5). This protects the panel from damage and makes the air conditioner easier to handle during installation.
,
.
_, _,
:.
6
l
4
l
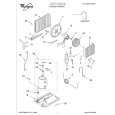
Slide unit out of cabinet. First, disconnect the green ground wire at the left-front corner of base of unit by removing retaining screw (save screw for reuse later). Now slide unit out of cabinet by pulling out on handle on bottom (see Figure 6).
Attach side mounting angles to the sides of the cabinet by using four hex-head sheet metal screws (see Figure 8). Punch holes in seal strip before driving screws. Be sure flange of each side mounting angle faces inside. Now attach top mounting angle to cabinet by using three hex-head sheet metal screws. Again, be sure flange is facing inside.
GROUND WIRE SCREW -
�HANDLE
|
|
|
> |
|