|
|
|
Categories
|
|
Information
|
|
Featured Product
|
|
|
 |
|
|
There are currently no product reviews.
 ;
So usefull to make my installation a breeze. 5 stars on quality.
;
very helpful, the information in these manuels are very detailed
;
Please tell us what you think and share your opinions with others. Be sure to focus your comments on the product. You will receive $2.00 of store credit for Your review.
;
Please tell us what you think and share your opinions with others. Be sure to focus your comments on the product. You will receive $2.00 of store credit for Your review.
;
Good copy and great customer service! There was some confusion with my order and it was resolved promptly!
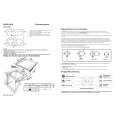
Changing the Battery
When the indicator goes dim or no longer lights while an effect is on, it means that the battery is nearly dead and must be replaced. Replace the battery following the steps below.
* The use of an AC adaptor is recommended as the unit�s power consumption is relatively high. Should you prefer to use batteries, please use the alkaline type.
fig.12
1. Loosen the thumbscrew at the front of the pedal, then lift the pedal upwards to open the unit.
* The thumbscrew can be left in the pedal while changing the battery.
2. Remove the old battery from the battery housing, and remove the snap cord connected to it. 3. Connect the snap cord to the new battery, and place the battery inside the battery housing. * Be sure to carefully observe the battery�s polarity (+ versus �). 4. Slip the coil spring onto the spring base on the back of the pedal, then close the pedal.
* Carefully avoid getting the snap cord caught in the pedal, coil spring and battery housing.
Thumbscrew
Pedal Spring Base
Battery Snap Cord Coil Spring Guide Bush Hole Battery Snap Battery Housing 9V Battery
5. Finally, insert the thumbscrew into the guide bush hole and fasten it securely.
16
|
|
|
> |
|