|
|
|
Categories
|
|
Information
|
|
Featured Product
|
|
|
 |
|
|
There are currently no product reviews.
 ;
It is perfect, exactly what we needed. It's like the paper version but less clutter.
 ;
Received my manual within 24 hours. Very clear scan of the manual I needed. Thanks!
;
Very clear scan, I recommend it. Definitely a must have for any 3362 owner.
Alpine could have written a slightly more complete manual, though. It's already pretty huge, but the unit has so many functions, I feel some more explanation would have been better.
Yamaha's manual of their comparable YDSP-1 is a little better in my opinion.
;
Immediate response with excellent service - highly reccommended
;
Correct manual received and of good quality but the contents of the file for the Service Manual for the same monitor is for a 20" TV not the RGB Monitor.
Option 2�Plastered wall with no molding
If the plastered wall is to be flush with the cabinet and no molding is used, the wood frame must be set ¹��" (13 mm) into the inside wall.
3. Cut opening through the wall. Remove and save insulation. NOTES:
s
Dimension for depth depends on wall thickness and type of molding. Do not block louvers in air conditioner cabinet. Use 1" (2.5 cm) or thicker lumber for wood frame.
AB
C
s s
D
A
B
C
A. Plastered wall B. Inside wall C. Wood frame D. Louvers A. Outside width B. Outside height C. Depth
1. Construct wood frame. See �Location Requirements� for dimensions. 2. Measure outside width and height of frame to determine wall opening dimensions.
4. Apply wood preservative to the outside exposed surface. 5. Insert the frame in the wall opening. Square and level frame. 6. Attach frame securely to the wall.
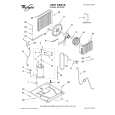
Position the Air Conditioner Cabinet
s s
Handle air conditioner gently. Be sure your air conditioner cabinet does not fall out of the opening during installation or removal. The location where the power cord exits the air conditioner should be no more than 4 ft (122 cm) from a grounded 3 prong outlet. Do not block the louvers on the front panel. Do not block the louvers on the outside of the air conditioner.
s
4. Check that air conditioner cabinet is tilted to the outside so that water will run to the outside. 5. Pull left-hand curtain out until it fits into window channel. Use a ³���" drill bit to drill a starter hole through the hole in the curtain housing and into the lower window sash.
Front View
A B
s s
Window installation (on some models)
1. Center empty cabinet in window. Check that lower rail of air conditioner cabinet is behind and against back side of windowsill. Maintain a firm hold on the air conditioner cabinet. Lower window sash to hold cabinet in place. 2. Measure the distance between the right-hand side of the cabinet and the inside of the window channel. 3. Repeat for the left side. Adjust the cabinet until the distance on each side is the same.
A. Left-hand curtain B. Window channel
Top View
B
A B A C C
A. Left-hand curtain B. Window channel C. #8 x ³��" round-head screw A. Window sash B. Empty cabinet C. Window channel
7
|
|
|
> |
|