|
|
|
Categories
|
|
Information
|
|
Featured Product
|
|
|
 |
|
|
There are currently no product reviews.
 ;
Great price, Quick delivery, the document was very usefull A+++++++++++++++
;
Thank´s for your help, I already recived these manual from you
;
Thank you for your manual It has the basic things to and i use the Oszi for Longer Time.
THX
;
Actually, I was looking for this information for 3 years!...now thanks to you, the manual is on my hands and of great help, cause I understand now where I was doing wrong connections and wires...excellent, I'll be back to you if in need, thank you.
 ;
This manual covers the main equipment features only. While it also includes the procedure for saving and loading from the now long obsolete memory cards it does not mention the how to operate with the optional floppy drive interface so I am still at a loss about how to use this! Note that there is a separate manual covering the MIDI interface and programming via the keyboard, not included in this download. You will also need to get hold of this if you want to use the MIDI interface properly. Basically there is little difference between this manual and the free to download manual for the similar PR60 model.
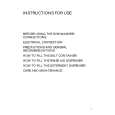
Option 1�Wood, metal or plastic molding
When you are using wood, metal or plastic molding, the wood frame should line up with inside wall as shown.
s
Use 1" (2.5 cm) or thicker lumber for wood frame.
A
ABC
B
D
C
A. Outside width B. Outside height C. Depth A. Molding B. Inside wall C. Wood frame D. Louvers
4. Apply wood preservative to the outside exposed surface. 5. Insert the frame in the wall opening. Square and level frame. 6. Attach frame securely to the wall.
Option 2�Plastered wall with no molding
If the plastered wall is to be flush with the cabinet and no molding is used, the wood frame must be set ¹��" (13 mm) into the inside wall.
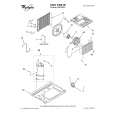
Install Cabinet into Wood Frame
1. Insert cabinet into the framed wall opening. The top of the cabinet should extend ¹��" (13 mm) into the room. If there is trim, the cabinet should extend ¹��" (13 mm) past the trim.
AB
C
D
B A
A. Plastered wall B. Inside wall
C. Wood frame D. Louvers
A. ¹��" (13 mm) extending into room B. Trim
Install Wood Frame
1. Construct wood frame. See �Location Requirements� for dimensions. 2. Measure outside width and height of frame to determine wall opening dimensions. 3. Cut opening through the wall. Remove and save insulation. NOTES:
s s
2. Use a level to check that cabinet is level side to side.
A
A. Level
Dimension for depth depends on wall thickness and type of molding. Do not block louvers in air conditioner cabinet.
3. Check that air conditioner cabinet is tilted to the outside so that water will run to the outside. 4. Reuse the insulation to seal opening between cabinet and frame. 5. Use existing holes and 6 - #10 x 1" wood screws (not provided) to attach cabinet to frame. NOTE: Do not overtighten screws or cabinet will distort and provide a poor air seal between cabinet and air conditioner. 6. Caulk all outside wall openings around cabinet.
9
|
|
|
> |
|