|
|
|
Categories
|
|
Information
|
|
Featured Product
|
|
|
 |
|
|
There are currently no product reviews.
 ;
Genuine Toshiba owner's manual. Couldn't really ask for more. And written in understandable English in contrast to a few recent experiences I have had with manuals for other equipment other than Toshiba but made in China and written in "Chinglish"!
;
I purchased a vintage Sony mixer off eBay and within the hour was able to locate and purchase the manual for it.I mean really,where else can you find a manual for a product made in 1983!? It was easy to find and purchase/download the manual I needed.I will use this site again for other equipment I have! Great site!
;
manual de usuario perfecto y completo de buena calidad de impresion y muy detallado ideal !
 ;
It`s full copy of a service manual from url http://www.philips.owner-manuals.com/PM3216-service-manual-PHILIPS.html
;
perfect! you just sent to me the copy in Italian witout even my specification!!!! so you are really smart cooperative and efficient. To my opinion the best place all over to get a manual of electronics!!!!
Option 1�Wood, metal or plastic molding
When you are using wood, metal or plastic molding, the wood frame should line up with inside wall as shown.
s
Use 1" (2.5 cm) or thicker lumber for wood frame.
A
ABC
B
D
C
A. Outside width B. Outside height C. Depth A. Molding B. Inside wall C. Wood frame D. Louvers
4. Apply wood preservative to the outside exposed surface. 5. Insert the frame in the wall opening. Square and level frame. 6. Attach frame securely to the wall.
Option 2�Plastered wall with no molding
If the plastered wall is to be flush with the cabinet and no molding is used, the wood frame must be set ¹��" (13 mm) into the inside wall.
Install Cabinet into Wood Frame
1. Insert cabinet into the framed wall opening. The top of the cabinet should extend ¹��" (13 mm) into the room. If there is trim, the cabinet should extend ¹��" (13 mm) past the trim.
AB
C
D
B A
A. Plastered wall B. Inside wall
C. Wood frame D. Louvers
A. ¹��" (13 mm) extending into room B. Trim
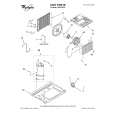
Install Wood Frame
1. Construct wood frame. See �Location Requirements� for dimensions. 2. Measure outside width and height of frame to determine wall opening dimensions. 3. Cut opening through the wall. Remove and save insulation. NOTES:
s s
2. Use a level to check that cabinet is level side to side.
A
A. Level
Dimension for depth depends on wall thickness and type of molding. Do not block louvers in air conditioner cabinet.
3. Check that air conditioner cabinet is tilted to the outside so that water will run to the outside. 4. Reuse the insulation to seal opening between cabinet and frame. 5. Use existing holes and 6 - #10 x 1" wood screws (not provided) to attach cabinet to frame. NOTE: Do not overtighten screws or cabinet will distort and provide a poor air seal between cabinet and air conditioner. 6. Caulk all outside wall openings around cabinet.
9
|
|
|
> |
|