|
|
|
Categories
|
|
Information
|
|
Featured Product
|
|
|
 |
|
|
There are currently no product reviews.
 ;
Having bought a pre-owned Sony FM stereo tuner through eBay, it came without any manuals. It soon became clear that to get the best from this excellent tuner I needed a decent manual because much of the operation was not intuitive to a newboy to hi fi like me. I managed to download the official Sony multi-lingual manual from Owner-Manuals.com with no problem at all - a really quick and easy service. I'm very glad I did because I found out all the operations of the tuner and was then able to not only set it up quickly but also to get much more from it that poke-and-hope trialling would ever achieve. In my book $4.99 very well spent.
;
This manual is immaculate in it's accuracy. Everything is written very clearly and easy to understand. Written by a professional who wants to convey a clear and easy to understand message!!
;
This Manual (as downloaded) is both informative and comprehensive and has proved to be extremely useful. thoroughly recommended.
;
everything is ok, thank you very much! Product is good, no problems with download!
;
Great site, I always find all the manuals I need and i can't find anywhere else. PDF for the Sony PCM 3348 is complete and scan is good quality. Thank you!
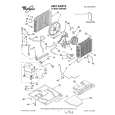
16. Fasten cabinet to window sill. Lower window sash firmly onto cabinet. Place a carpenter�s level inside the cabinet and make sure cabinet is level side-to-side. Then drill starter holes into the cabinet base and the window sill. Use roundhead wood screws (H) to fasten cabinet to window sill, but do not tighten the screws. 17. Make sure cabinet has proper outward slope. Place carpenter�s level in the right side of the cabinet. There should be a l/2 bubble tilt (W [6 mm]per foot [30.5 cm]) toward the outside. Repeat for left side of cabinet. The tilt to the outside is needed for proper drainage. 18. Attach 2%� (63.5 mm) seal strip (I) to inside of cabinet. Make sure the seal strip is flush with the front edge of the cabinet. This seal strip provides a seal between the air conditioner base and the cabinet.
19. Assemble the outside support. Attach the vertical supports (J) to the angled supports (K). Use the round-head bolts (L), flat washers (M), lock washers (N) and the nuts (0) for attachments. Then attach these supports to the bottom of the cabinet, but DO NOT tighten the bolts at this time. Attach the wall rail (P) to the bottom of the supports and slide the support assembly toward the house until the wall rail presses firmly against the wall. Check that you have the % bubble tilt to the outside. This is needed for proper drainage. Now tighten all bolts. Tighten angled support bolts last so wall rail fits tightly against the house. NOTE: If your house is constructed of materials that could be damaged by the wall rail, fasten a board or other protective material to the wall rail so that it is between the wall rail and the house.
continued
on next page 11
|
|
|
> |
|