|
|
|
Categories
|
|
Information
|
|
Featured Product
|
|
|
 |
|
|
There are currently no product reviews.
 ;
It is perfect, exactly what we needed. It's like the paper version but less clutter.
 ;
Received my manual within 24 hours. Very clear scan of the manual I needed. Thanks!
;
Very clear scan, I recommend it. Definitely a must have for any 3362 owner.
Alpine could have written a slightly more complete manual, though. It's already pretty huge, but the unit has so many functions, I feel some more explanation would have been better.
Yamaha's manual of their comparable YDSP-1 is a little better in my opinion.
;
Immediate response with excellent service - highly reccommended
;
Correct manual received and of good quality but the contents of the file for the Service Manual for the same monitor is for a 20" TV not the RGB Monitor.
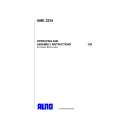
4. Pull left curtain (D) out until it fits into the window channel (E). Repeat with right curtain.
D E
Top view
5. Insert one of the slotted round-head screws (F) through left curtain and into the window channel or through alternate hole (G) at the top of the curtain and into the window channel to fasten the curtain to the window sash. Repeat for right curtain.
E
D F G
F
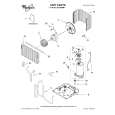
Completing installation
NOTE: Install window-lock bracket to prevent air conditioner from falling out of window. 1. Place window-lock bracket (H) on top of lower window and against upper window sash (I). 2. Use a 3/32 in. drill bit to drill a starter hole through the hole in the bracket. 3. Attach window-lock bracket by inserting one of the slotted round-head screws through the window lock bracket (H) and into the upper window sash (I).
H I
J
K
4. Insert foam seal (J) behind the top of the lower window sash (K) and against the glass of the upper window. 5. Plug power cord into outlet.
7
|
|
|
> |
|