|
|
|
Categories
|
|
Information
|
|
Featured Product
|
|
|
 |
|
|
There are currently no product reviews.
 ;
This manual covers the main equipment features only. While it also includes the procedure for saving and loading from the now long obsolete memory cards it does not mention the how to operate with the optional floppy drive interface so I am still at a loss about how to use this! Note that there is a separate manual covering the MIDI interface and programming via the keyboard, not included in this download. You will also need to get hold of this if you want to use the MIDI interface properly. Basically there is little difference between this manual and the free to download manual for the similar PR60 model.
;
Good list of manuals. I found a very rare one and easily get. Should be promptly to download, as we must to wait hours even after confirmed payment.
;
The manual was properly scanned and perfectly readable. The only small problem is that I couldn't use my dear Ctrl + F to find a word I needed.
;
Nothing wrong with the manual or the delivery - came to me the same day I ordered it. But afterwards I realized that I ordered the wrong manual. Probably better with the Quick start - version. So maybe it would be better if we could see a list with inhold for each manual before ordering?
 ;
Bought T4850 High End Tuner a few years ago, but i didn't know where all the buttons were used for. So i purchased the owners manual. Perfect! Just what i needed.
Excessive Weight Hazard Use 2 or more people to move and install air conditioner. Failure to do so can result in back or other injury.
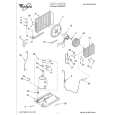
4. Remove side curtains. Slide curtains out to their fullest width. From the back side, remove the Phillips-head screws (A) holding the curtains to the cabinet. 5. Remove the slotted hex-head screws (B) holding the top channel. 6. Remove the slotted hex-head screws (C) on the sides of the cabinet. 7. Holding both sides of the cabinet, carefully lift the cabinet off the base. Watch out for the sharp metal fins on the front and rear coils. 8. Wrap the motor, electrical control box, and the compressor terminal box in plastic film to make sure no water or other liquid gets inside. Water or other liquids could damage the insulation and cause serious mechanical problems. 9. Clean and hose out the base, coils, and condensate pans. Clean at least once a year, or more often if the condenser coils and pans collect dirt, sand, leaves, insects, or algae. Also, clean if you detect an odor coming from the air conditioner. Do not use the collected water for drinking purposes. It is not sanitary. 10. Remove plastic film from motor and electrical parts. 11. Replace unit in the cabinet. Reattach top channel and side curtains. Tighten all screws. 12. Reinstall unit in the window. 13. Replace the front panel. 14. Plug in the power cord. NOTE: It is a good idea to wait 24 hours before starting the unit again. This allows time !or all areas to dry thoroughly. The water from rainfall or from normal operation does not harm the components. 9
|
|
|
> |
|