|
There are currently no product reviews.
 ;
So usefull to make my installation a breeze. 5 stars on quality.
;
very helpful, the information in these manuels are very detailed
;
Please tell us what you think and share your opinions with others. Be sure to focus your comments on the product. You will receive $2.00 of store credit for Your review.
;
Please tell us what you think and share your opinions with others. Be sure to focus your comments on the product. You will receive $2.00 of store credit for Your review.
;
Good copy and great customer service! There was some confusion with my order and it was resolved promptly!
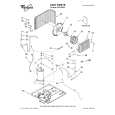
3. Place one end of tray center over carriage bolt.
Attach support legs
1. Determine the correct slots on the tray side from the type of exterior construction of the building. Thin wall construction (vinyl, wood, etc.)
1
1. 1st and 2nd slots
Thick wall construction (brick) 1
4. Then place flat washer, lock washer and hex nut. NOTE: Do not tighten. The leg must be able to move freely to adjust angle when installed. 1 2 3 4
5
1. Hex nut 2. Lock washer 3. Flat washer 1. 2nd and 3rd slots 4. Tray center 5. Carriage bolt
5. Insert second carriage bolt through tray side and attach other end of support leg. NOTE: Do not tighten. The leg must be able to move freely to adjust angle when installed.
2. Insert carriage bolt up through slot on tray-frame side and support leg.
1 2 3
4
1. Hex nut 2. Lock washer
3. Flat washer 4. Carriage bolt
6. Install support leg on other side.
6
|