|
|
|
Categories
|
|
Information
|
|
Featured Product
|
|
|
 |
|
|
There are currently no product reviews.
 ;
Good quality instructions manual. Very useful to me. Quick and excellent service from Owner-Manuals... Thanks !!!
;
Sono molto soddisfatto e, quando mi necessiterà, mi avvarrò nuovamente di questo servizio!
;
A comprehensive Operating and Service Manual. All schematics are complete and easy to read. The PCB drawings and complete parts list are very helpful. I would definitely recommend this manual.
;
SCANNING OF HIGH QUALITY
VERY, VERY HIGH VELOCITY DOWNLOAD
VERY GOOD PRICE,
TRUE SATISFIED, THANKS
;
Genuine Toshiba owner's manual. Couldn't really ask for more. And written in understandable English in contrast to a few recent experiences I have had with manuals for other equipment other than Toshiba but made in China and written in "Chinglish"!
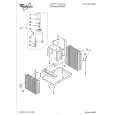
10. Slide the air conditioner onto the support platform. Be sure the unit side channel butts against the vertical edge of the window frame. Watch out for the sharp metal fins on the front and rear coils. NOTE: If unit side channel does not fit securely, remove air conditioner and readjust leveling bolt.
11. Using the existing clearance holes in the
Excessive Weight Hazard Use 2 or more people to move and install air conditioner. Failure to do so can result in back or other injury.
12.
13.
14.
15.
16. 17.
18.
air conditioner�s bottom bar as guides, drill two �/a� holes through the window channel frame. Install two self-threading screws through the clearance holes and into these holes. Tighten the screws securely. The air conditioner should be firmly anchored to the window channel frame. Be sure your air conditioner does not fall out during installation. Slide the inside window sash closed. Make sure the vertical edge of the inside window sash is pressed firmly against the side of the unit cabinet. Cut remaining adhesive back foam seal equal to the width of the window opening. Remove the backing and apply to the top inside edge of the window frame. Install the speed clips on the top and bottom inside edges of the window to provide locking. Insert the appropriate plastic foam seal between the inside window sash and the outside window. Place the top retainer on the top edge of the filler panel. Then place the bottom edge of the filler panel into the groove of the bottom retainer which is mounted on the air conditioner. The filler panel may be trimmed with a knife or scissors to fit the window height. Slide the sliders upward making sure the filler panel aligns in the sliders. With the sliders up against the top retainer, drill �/en hole through the window frame using the existing clearance hole in the slider as a guide. Install the selfthreading screw in the hole and tighten securely. Repeat for the other slider. Check all seals and plug all air leaks around the air conditioner with a suitable weather-proof sealing compound.
SUpport platform
Window channel
frame
Channel
Foam seal
|
|
|
> |
|