|
|
|
Categories
|
|
Information
|
|
Featured Product
|
|
|
 |
|
|
There are currently no product reviews.
 ;
manual de usuario perfecto y completo de buena calidad de impresion y muy detallado ideal !
 ;
It`s full copy of a service manual from url http://www.philips.owner-manuals.com/PM3216-service-manual-PHILIPS.html
;
perfect! you just sent to me the copy in Italian witout even my specification!!!! so you are really smart cooperative and efficient. To my opinion the best place all over to get a manual of electronics!!!!
;
Well Well Well!!!! Good manual perfect for my hobby!!! As Before you have done a very well done work!!!! Thank you
;
Super nice! Good to have a manual in digital format.
~�
-i
.
i
them loose enough so there is about l/16� of play. Tighten the bottom screws (Item 2). This will pull the unit mounting flange tightly to the window frame, sealing and locking the air conditioner in place.
Remove selected.
the glass from the frame opening Clear away any hardened putty.
WIN[IOW
FRAA(IE
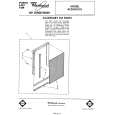
Before sliding unit through the casement opening, remove the bottom window bracket (Item 3) on both sides of the unit. NOTE: only the top screws (Item 1) need to be removed. Check the knurled knob screws to see that the top mounting brackets (Item 5) are retracted to the center of the unit. They must not interfere with the window frame when the unit is installed (see Figure 23).
8.
Loosen the two knurled knob screws and slide the top mounting bracket (Item 5) toward the outside of the unit, engaging the window frame (see Figure 26). Tighten the knurled knob screw in this position. This will lock the unit in place so it cannot tilt into the room. The installation is now complete.
WE% s)taWlM
OUTSIt% OF WBJOOW
6
l
Lift the unit into the window opening and slide it back until the mounting frame comes into contact with the window frame (see Figure 24).
9
l
OPTIONAL MOUNTING If the window thickness use the four mounting the unit, remove
INSTRUCTIONS will not allow you to brackets provided with and fasten flanges
brackets
of unit with sheet metal screws (see Figure 27). These screws are not provided. The window opening for your installation must not be wider than 15�.
|
|
|
> |
|