|
There are currently no product reviews.
 ;
The only reason I gave this less than 4 stars, is because it shouldn't take 24 hrs to have the download available. I was surprised to find that I had to wait until the next day to be able to download the manual that I paid for.
The manual itself is the correct manual.
 ;
Excellent replacement for original Owner´s Manual. I am totally satisfied!
;
Great service. Manual is as advertised and delivered when promised.
;
Perfect quality, highly appreciated service !!!
Fast delivery of the download info, no issues at all. Recommended E-manual shop !!!
;
hi owners manual- crew,
i am very satisfied about the trade with you.
if i need some other manuals, i will contact you again.
thanks
frank kappler
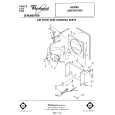
1. To remove
outer cabinet,
o Disconnect power cord. D Take off the plastic grille. Remove the two screws at the bottom. Drop grille down ana take out
TOP FLANGE SCREWS
(side of cabinet)
c. Remove the socket head screws on each side and top flange screws (see illustrations). On 30, 40 and 48 pt. models, also remove rear grille. Pull out at bottom and drop grille down. d Lift cabinet from unit.
2. Coils should be inspected annually. If needed. brush clean with warm water and mild detergent. Rinse and dry. Be sure power supply cord is disconnected.
COILS
3. The compressor
IS sealed
and needs
no oiling
4. The fan motor is prelubricated and does not require further oiling under normal operating conditions. However, if the dehumidifier is operated under severe environmental conditions (dust, dirt, high temperatures) the fan motor should be oiled annually through the provided oil tubes (holes]. An easy to use capsule of especially recommended oil (Part Number 10943) IS available through your nearest Whirlpool Factory Service Center, or use SAE #20 nondetergent oil. 5. Wash plastic parts with a soft cloth, warm water and mild detergent. Rinse and dry with a soft cloth. 6. Replace cabinet supply cord. grille(s). Reconnect power
|