|
There are currently no product reviews.
 ;
So usefull to make my installation a breeze. 5 stars on quality.
;
very helpful, the information in these manuels are very detailed
;
Please tell us what you think and share your opinions with others. Be sure to focus your comments on the product. You will receive $2.00 of store credit for Your review.
;
Please tell us what you think and share your opinions with others. Be sure to focus your comments on the product. You will receive $2.00 of store credit for Your review.
;
Good copy and great customer service! There was some confusion with my order and it was resolved promptly!
3GB94501.fm5 Page 73 Monday, July 9, 2001 5:01 PM
CARE AND MAINTENANCE
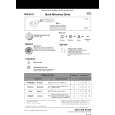
Before cleaning or carrying out maintenance, switch off the appliance, disconnect the mains plug and turn off the water tap. Cleaning the outside of the appliance: To clean the outside of the appliance, use a neutral detergent and a damp cloth. Clean the control panel with a damp cloth only. Do not use abrasive detergents. Cleaning the inside of the dishwasher: Regularly wipe the door seal and inside of the door with a damp cloth to remove any food residue. Upper spray arm: 1. Slacken the fixing nut (by turning it counter-clockwise) and detach the spray arm by pulling it down. 2. Rinse the nozzles. 3. Remount the spray arm by aligning it with the rotary mounting. 4. Tighten the fixing nut by turning it clockwise. The fixing nut must be tightened until it clicks! Make sure the spray arm rotates freely.
Lower spray arm: 1. 2. 3. 4. Remove the spray arm by lifting it upwards. Rinse the nozzles. Remount the spray arm by aligning it with the rotor pin and insert it. Push the spray arm down firmly until it is fixed in place. Make sure the spray arm rotates freely.
73
|