|
|
|
Categories
|
|
Information
|
|
Featured Product
|
|
|
 |
|
|
There are currently no product reviews.
 ;
I was impressed with the quality of service (frequent e-mails to let you know the status of your order), and the speed at which the download became available. The manual was a life saver and was not easy to track down. Thank you for such an excellent service.
;
the manual was just what i wanted it had all the revelent information required to operate the hifi .Iwould use any manual i downloaded for any item which needs a manual
;
Die gewünschte Bedienungsanleitung wurde vereinbarungsgemäß in deutsch bereitgestellt. Sie ist gut lesbar. Kein Kauderwelsch.
Danke für den Service.
;
GOOD SERVICE MANUAL GOT ALL THE INFO. THAT I NEEDED..
;
Excellent product and service. I bought a second-hand Casio CPS-60 keyboard which had no manual. Packed full of features which I had no idea how to operate . . .
Google search found this site (and others with the same manual for sale for $8.99!)
I bought the manual and within an hour the download was available. Quality of the scanned images is good - very clear - and the PDF has been created with the pages in the correct order.
I would definitely use this site again.
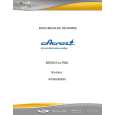
2.- Verify that the oven burner has been ignited.
1.- Open the oven door, light a match and place the flame at the igniter hole in the front of the oven tray while you push in and turn the oven knob 1/4 of the way, the burner will light immediately.
� How to light the oven burner with thermocontrol, manually:
Some models have the multiposition burners on the left side of the range.
Some models (see page 2 have multiposition burners, the position of these burners can be changed, allowing to concentrate the heat for large pots.
3.- Put the burners down again, be sure the spark plug has been inserted in the burner hole.
2.- Take the multiposition burners, lift and rotate them 180° (half turn).
1.- Ensure that the burners are cold.
� To rotate the burners:
1.- Light a match and place it close the burner while you push and turn the knob 1/4 of the way,the burner will light immediatly. .
� To turn on the surface burners manually:
MULTIPOSITION BURNERS
OVEN WITH THERMOCONTROL
HOW TO TURN ON THE BURNERS MANUALLY
Some models have the multiposition burners on the center of the range or on the sides.
Knob on the mark of ignition.
MAXIMUM FLAME
REGULAR BURNERS POSITION
MAXIMUM FLAME
OFF
OFF
ROTATED BURNERS
MINIMUM FLAME
MINIMUM
FLAME
7
ENCENDIDO MANUAL DE QUEMADORES
� Para encender los quemadores superiores: Acerque un cerillo encendido al quemador y al mismo tiempo presione y gire 1/4 de vuelta la perilla del quemador correspondiente.
FLAMA M�XIMA APAGADO
FLAMA M�NIMA
Perilla en posición de encendido.
DUO FLAMA (QUEMADORES MULTIPOSICI�N)
Algunos modelos (ver Pag. 2) cuentan con quemadores multiposición, estos quemadores se cambian de posición permitiendo concentrar más calor para ollas grandes.
Algunos modelos tienen los quemadores multiposición en el lado izquierdo de la estufa. Para girar los quemadores: 1.- Los quemadores deben estar frÃos.
Algunos modelos tienen los quemadores multiposición al centro de la estufa o en los extremos.
2.- Tome el quemador multiposición, levántelo y girélo 180° grados (media vuelta). 3.- Vuelva a colocarlo, asegurándose que la bujÃa de encendido haya entrado en la perforación del quemador.
QUEMADORES SIN ROTAR QUEMADORES ROTADOS
HORNO CON TERMOCONTROL.
� Para encender el horno con termocontrol de encendido manual: 1.- Encienda un cerillo y colóquelo cerca del agujero de la charola del horno, al mismo tiempo presione y gire 1/4 de vuelta la perilla del horno. 2.- Verifique que el quemador del horno se haya encendido.
APAGADO FLAMA M�XIMA FLAMA M�NIMA
7
|
|
|
> |
|