|
There are currently no product reviews.
 ;
Exactly as described, the full user-manual (145 pages). Perfect.
30302006I.fm Page 64 Tuesday, March 27, 2007 10:22 AM
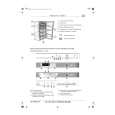
Rimozione dei cassetti
� Tirare i cassetti verso l�esterno fino a battuta, sollevarli leggermente ed estrarli. Al fine di ottenere maggior volume possono essere estratti i cassetti, ad eccezione di quello di fondo, i relativi pattini e la griglia bianca rimovibile (se disponibile) (Fig.1) Controllare che il carico non superi le indicazioni di limitazione, se presenti, sulle pareti laterali del prodotto. Fig. 1
Vano
Questo comparto, permette solamente la produzione di cubetti di ghiaccio e il posizionamento dell'eutettico come da Fig.2 e Fig.3, (se presente). Per i tempi di conservazione rispettare rigorosamente le istruzioni riportate sull�involucro dei cibi surgelati.
Fig. 2
Produzione di cubetti di ghiaccio
� Riempire di acqua per 2/3 la bacinella per il ghiaccio e riporla nell�apposito vano di congelamento. � Qualora la bacinella fosse attaccata al fondo del congelatore, non utilizzare oggetti appuntiti o taglienti per rimuoverla. � Per facilitare la rimozione dei cubetti di ghiaccio dalla bacinella, fletterla leggermente. Nota: La riapertura della porta del congelatore risulterà difficoltosa subito dopo averla chiusa (ad eccezione dei modelli dotati di apposita valvola). Si prega di attendere due o tre minuti, per consentire la compensazione della depressione formatasi. Fig. 3
64
|