|
There are currently no product reviews.
 ;
This service manual includes drawings, schematics, exploded views, parts list, operating details, and more. Very good scans, very readable. The only thing that made it a 4 star rating was on approximately 4 scans only half of the page was scanned then the other half. I would have preferred the pages to be whole scans.
 ;
Good manual contains all it takes to update, repair,these types of mixers.Thanks.
;
Great service. Fast response. High quality scan. Good price.
Thank you very much!!!
Oleg S.
;
Well-scanned, complete manual. Contains the information needed for repair and maintenance.
;
It's great to be able to obtain a precious technical information for a real old equipment. The one I got helps me a lot in the area of wiring diagram to repair my antique. PDF gave me clear enough information to find out thr details. Thanks for giving me the oppotunity to be able to access to almost vanished informations.
FILM PROJECTOR UNIT (A846)
24 February, 1999
[I]
[A] [D] [B] [E]
[C]
[F]
[H]
[G]
A846I503.WMF
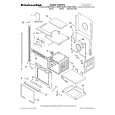
9. Set the film strip holder [A] into the film projector unit at the base film setting position. NOTE: Push the film strip holder lightly to confirm that the film strip holder is set correctly. 10. Turn on the test switch [B] on the projector control board and turn on the projector unit main switch [C].
øCAUTION
The lamp housing and reflector [D] will become very hot. The lamp cooling fan [E] will start turning suddenly when the lamp housing temperature becomes high. Keep hands away from these components to avoid any injury. 11. Loosen the wing nut [F]. 12. Adjust the position of the projected light by turning the dial [G] with a hexagon wrench [H] until it is at the center of the 4" x 5" frame [I] which is reflected in the mirror unit. 13. Tighten the wing nut [F]. 14. Turn off the projector main switch and the test switch. 15. Reinstall the lamp cover and other covers.
3-52
|