|
|
|
Categories
|
|
Information
|
|
Featured Product
|
|
|
 |
|
|
There are currently no product reviews.
 ;
Turns out this was not the manual i was looking for. The concertmate 670 keyboard i have is a "Realistic" model made for Radio Shack and none of the diagrams on the owners manual i received matches up. HOWEVER, I must say the service Owners Manual provides was fast and efficient by being available online. The manual was in good readable condition and easily downloaded.
 ;
Great price, Quick delivery, the document was very usefull A+++++++++++++++
;
Thank´s for your help, I already recived these manual from you
;
Thank you for your manual It has the basic things to and i use the Oszi for Longer Time.
THX
;
Actually, I was looking for this information for 3 years!...now thanks to you, the manual is on my hands and of great help, cause I understand now where I was doing wrong connections and wires...excellent, I'll be back to you if in need, thank you.
Bevor Sie beginnen
Operazioni preliminari
Antes de la conexión
Lautsprecheranschlüsse
Vorsicht:
Vor dem Anschlu� der Lautsprecherkabel unbedingt das Gerät ausschalten. Andernfalls können die Lautsprecher durch Kontaktgeräusche etc. beschädigt werden. < �berprüfen Sie die Impedanz (Ohmzahl, �) Ihrer Lautsprecherboxen. Dieser Verstärker ist für den Anschlu� von Boxen mit einer Impedanz zwischen 6 � und 16 � geeignet. Die roten Lautsprecherklemmen des Verstärkers sind die + (positiv) Anschlüsse, und die schwarzen Klemmen sind die _ (negativ) Anschlüsse. < Die +-Seite des Lautsprecherkabels ist markiert, um eine Unterscheidung der beiden Phasen zu ermöglichen. Schlie�en Sie das markierte Kabel an die roten Boxenanschlüsse an und das nicht markierte Kabel an die schwarzen. < Isolieren Sie maximal 10 mm der Boxenkabel ab. Längere, unisolierte Enden können sehr leicht zu einem Kurzschlu� führen. Verdrillen Sie die abisolierten Enden der Kabel so fest, da� keine einzelnen Drähte herausragen können.
Collegamento dei diffusori
Attenzione:
Per evitare di danneggiare i diffusori con segnale di livello eccessivo, prima di collegarli spegnere il sistema. Collegare ciascun diffusore al suo terminale. < Verificare l'impedenza dei vostri diffusori. Si possono utilizzare diffusori con impedenza compresa tra 6 e 16 �. I terminali rossi del diffusore sono quelli positivi + ; i terminali neri sono quelli negativi _. < L'estremità positiva del cavo dei diffusori è contrassegnata, per distinguerla bene dall'estremità negativa. Collegare l'estremità contrassegnata (positiva) al terminale rosso + e l'estremità non contrassegnata al terminale nero _. < Prima di effettuare il collegamento, togliere il rivestimento isolante esterno del cavo per circa 10 mm (non di più, per non provocare un cortocircuito). Attorcigliare strettamente le estremità dei fili.
Conexiones de los altavoces
Precaución:
Evite dañar los altavoces con la entrada súbita de una señal de alto nivel, asegúrese de desconectar la alimentación antes de conectar los altavoces. < Compruebe la impedancia de los altavoces. Los altavoces deberán tener una impedancia de 6 a 16 ohmios. Los terminales de altavoz rojos del amplificador corresponden al positivo +, y los negros al negativo _. < El conductor positivo del cable de altavoz está identificado para distinguirlo del negativo. Conecte este conductor marcado al terminal positivo rojo +, y el conductor sin marcar al terminal negro _. < Prepare los cables de altavoz para la conexión desprendiendo aproximadamente 10 mm (como máximo, o de lo contrario se podrÃan originar cortocircuitos) del aislante exterior. Trence bien los conductores de manera que no queden dispersos.
Come effettuare il collegamento Hinweise zum Anschlu� der Lautsprecherboxen
(1) Verdrillen Sie die abisolierten Enden der Kabel so fest, da� keine einzelnen Drähte herausragen können. (2) Um die Kabel anschlie�en zu können, drehen Sie die Klemmschrauben der Anschlu�klemmen gegen den Uhrzeigersinn. Die Klemmschrauben lassen sich nicht komplett aus ihren Gewinden herausschrauben. (3) Stecken Sie die abisolierten Kabelenden in die Anschlu�öffnungen, und ziehen Sie die Klemmschrauben fest an (im Uhrzeigersinn drehen). (4) Vergewissern Sie sich durch leichtes, vorsichtiges Ziehen, da� die Kabel richtig festgeklemmt sind. (1) Attorcigliare strettamente le estremità dei fili. (2) Ruotare in senso antiorario il cappellotto del terminale per allentarlo e sfilarlo, senza però toglierlo del tutto. (3) Inserire le estremità attorcigliate e riavvitare il cappellotto in senso orario per garantire la sicurezza del collegamento. (4) Per verificare che il filo sia ben fissato, tirare leggermente il cavo.
Procedimiento de conexión
(1) Trence bien los conductores de manera que no queden dispersos. (2) Afloje los tapones de los terminales girándolos hacia la izquierda. Los tapones de los terminales de altavoz no se pueden extraer por completo de la base. (3) Inserte el hilo por completo en el terminal y gire el tapón hacia la derecha para asegurar la conexión. (4) Compruebe que el cable queda perfectamente asegurado tirando ligeramente de él.
DEUTSCH
ITALIANO
ESPA�OL
9
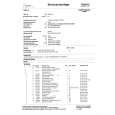
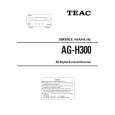 $4.99 AG-H300 TEAC
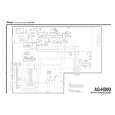
Service Manual Complete service manual in digital format (PDF File). Service manuals usually contains circuit diagr…
|
|
|
> |
|