|
|
|
Categories
|
|
Information
|
|
Featured Product
|
|
|
 |
|
|
There are currently no product reviews.
 ;
Great service. Manual is as advertised and delivered when promised.
;
Perfect quality, highly appreciated service !!!
Fast delivery of the download info, no issues at all. Recommended E-manual shop !!!
;
hi owners manual- crew,
i am very satisfied about the trade with you.
if i need some other manuals, i will contact you again.
thanks
frank kappler
;
Full Panasonic service Manual, as described, no problems
;
This place is amazing. Got our manual in a few hours. Print quality is excellent. Even the manufacturer didn't have this manual. The price was excellent. How many more stars can I give them? More than satisfied.
6 RECORDING 6-2 Recording Basic Operation
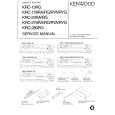
[STOP] button [REC REVIEW] button [REC] button
REC
POWER
STOP
POWER HDR
EJECT
RESET/ CANCEL
REC REVIEW
ON SCREEN SHIFT
REC
/REW REV PLAY
PAUSE/ STILL
PLAY
FF/
TRACKING
V. LOCK
TIMER SEARCH COUNTER LOCK CNT RESET
MENU
TIME MODE SET
REV ADV
FWD ADV
AG-
[POWER] button
[PAUSE/STILL] button
[ON SCREEN 7f] button [TIME MODE +/�] button
1 Press the [POWER] button to turn the operating
mode on. [The [POWER] indicator lights.
To check the recording
� To check recording in the Timelapse mode, the recording duration must be equivalent to at least 8 seconds at 2H(SP) or 6H(EP) speed. Recording check cannot be performed correctly if the recording duration is too short. (Example : In the 960-hour normal timelapse mode, the recording duration shoud be 64 minutes or more.) � During recording check, the audio signal is not output.
2 Select the recording speed mode with the [TIME
MODE +/�] button. For details, refer to �5-2 Recording/Playback Speed Mode Selection� on page 28.
3 Select the on-screen display position with the [ON
SCREEN 7/f] button.
5 Press the [REC REVIEW] button during recording.
� The tape is automatically played back in reverse for about 5 seconds, then the Play mode is engaged to allow you to check recording. After the sequence has played back, the recording mode is automatically re-engaged at the point where the recording was interrupted. � During playback in the Recording Check mode, check the picture to ensure that the recording is satisfactory. If the signals are not recorded properly, the built-in head cleaner cleans the heads and recording continues. In this case, the error code �E-09� is shown on the display for about 10 seconds.
[REC REVIEW] button During recording Recording check Defective Normal Recording
4 Insert a cassette with safety tab in place.
[The ( ) cassette indicator lights on the display. * If a cassette is loaded when the operating mode is off, the operating mode is switched on automatically (auto operate on function).
5 Press the [REC] button to start recording.
The recording indictor lights on the display, showing that the Record mode is engaged. * No sound is recorded during Timelapse Recording. [
To stop recording temporarily
6 Press the [PAUSE/STLL] button.
[ The record-pause indicator is shown on the display and the Pause mode is engaged.
* If the VCR remains in the Record-Pause mode for about 3 minutes, the head drum stops rotating to protect the tape. Although the Record-Pause mode remains engaged, there may be some distortion in the picture at the recording transition when you start recording again.
Error code �E-09� is shown for 10 seconds.
Auto head cleaning
Recording
To start recording again
7 Press the [REC] button.
[ The record-pause indicator on the display goes out and the Recording mode is engaged.
Note: � When a tape recorded in this unit is played back on another VCR (except another AG-TL950P), noise may appear in the picture.
To stop recording
8 Press the [STOP] button.
[The tape stops and the Stop mode is engaged.
30
|
|
|
> |
|