|
|
|
Categories
|
|
Information
|
|
Featured Product
|
|
|
 |
|
|
There are currently no product reviews.
 ;
Thank you for your manual It has the basic things to and i use the Oszi for Longer Time.
THX
;
Actually, I was looking for this information for 3 years!...now thanks to you, the manual is on my hands and of great help, cause I understand now where I was doing wrong connections and wires...excellent, I'll be back to you if in need, thank you.
 ;
This manual covers the main equipment features only. While it also includes the procedure for saving and loading from the now long obsolete memory cards it does not mention the how to operate with the optional floppy drive interface so I am still at a loss about how to use this! Note that there is a separate manual covering the MIDI interface and programming via the keyboard, not included in this download. You will also need to get hold of this if you want to use the MIDI interface properly. Basically there is little difference between this manual and the free to download manual for the similar PR60 model.
;
Good list of manuals. I found a very rare one and easily get. Should be promptly to download, as we must to wait hours even after confirmed payment.
;
The manual was properly scanned and perfectly readable. The only small problem is that I couldn't use my dear Ctrl + F to find a word I needed.
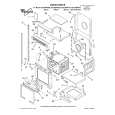
6 RECORDING 6-2 Recording Basic Operation
[STOP] button [REC REVIEW] button [REC] button
REC
POWER
STOP
POWER HDR
EJECT
RESET/ CANCEL
REC REVIEW
ON SCREEN SHIFT
REC
/REW REV PLAY
PAUSE/ STILL
PLAY
FF/
TRACKING
V. LOCK
TIMER SEARCH COUNTER LOCK CNT RESET
MENU
TIME MODE SET
REV ADV
FWD ADV
AG-
[POWER] button
[PAUSE/STILL] button
[ON SCREEN 7f] button [TIME MODE +/�] button
1 Press the [POWER] button to turn the operating
mode on. [The [POWER] indicator lights.
To check the recording
� To check recording in the Timelapse mode, the recording duration must be equivalent to at least 8 seconds at 2H(SP) or 6H(EP) speed. Recording check cannot be performed correctly if the recording duration is too short. (Example : In the 960-hour normal timelapse mode, the recording duration shoud be 64 minutes or more.) � During recording check, the audio signal is not output.
2 Select the recording speed mode with the [TIME
MODE +/�] button. For details, refer to �5-2 Recording/Playback Speed Mode Selection� on page 28.
3 Select the on-screen display position with the [ON
SCREEN 7/f] button.
5 Press the [REC REVIEW] button during recording.
� The tape is automatically played back in reverse for about 5 seconds, then the Play mode is engaged to allow you to check recording. After the sequence has played back, the recording mode is automatically re-engaged at the point where the recording was interrupted. � During playback in the Recording Check mode, check the picture to ensure that the recording is satisfactory. If the signals are not recorded properly, the built-in head cleaner cleans the heads and recording continues. In this case, the error code �E-09� is shown on the display for about 10 seconds.
[REC REVIEW] button During recording Recording check Defective Normal Recording
4 Insert a cassette with safety tab in place.
[The ( ) cassette indicator lights on the display. * If a cassette is loaded when the operating mode is off, the operating mode is switched on automatically (auto operate on function).
5 Press the [REC] button to start recording.
The recording indictor lights on the display, showing that the Record mode is engaged. * No sound is recorded during Timelapse Recording. [
To stop recording temporarily
6 Press the [PAUSE/STLL] button.
[ The record-pause indicator is shown on the display and the Pause mode is engaged.
* If the VCR remains in the Record-Pause mode for about 3 minutes, the head drum stops rotating to protect the tape. Although the Record-Pause mode remains engaged, there may be some distortion in the picture at the recording transition when you start recording again.
Error code �E-09� is shown for 10 seconds.
Auto head cleaning
Recording
To start recording again
7 Press the [REC] button.
[ The record-pause indicator on the display goes out and the Recording mode is engaged.
Note: � When a tape recorded in this unit is played back on another VCR (except another AG-TL950P), noise may appear in the picture.
To stop recording
8 Press the [STOP] button.
[The tape stops and the Stop mode is engaged.
30
|
|
|
> |
|