|
|
|
Categories
|
|
Information
|
|
Featured Product
|
|
|
 |
|
|
There are currently no product reviews.
 ;
Exactly as described, the full user-manual (145 pages). Perfect.
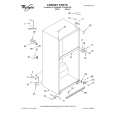
Rack mounting
The unit can be mounted into a 19-inch standard rack if the optional rack-mounting adapters (AJ-MA75P) are used. For the installation rails, it is recommended that the rail and bracket for 18q length (model number CC3061-99-0400) of Chassis Trak be used. If an even greater clearance is to be left between the VTR and rack when the VTR is pulled out, however, it is recommended that the 22q long Chassis Trak (model number CC-3001-99-0191) be used. (The complete slide rail and bracket unit is not available from Panasonic.) For further details, consult with your dealer.
1
Attach the inner members of the slide rails. Refer to Table 1 for the places where they are to be secured with the screws.
A
B
C
D
E
F
G
H
Table 1 Locations where the screws are secured on right (R) side of inner members of slide rails
18q Chassis Trak Part Number Screw holes to be used CC3061-99-0400 B, E, G 22q Chassis Trak CC3001-99-0191 C, H
Attach the inner members at the same symmetrical positions on the left (L) side. Note: The letters �A� to �H� are not actually marked on the side panels.
The length of the screws used is subject to restriction. Use screws which are less than 2/5q long in their place. 6 screws must be used to secure each inner member. When using the 22q long slide rails, secure the screws at 4 locations.
2
Attach the outer member brackets to the rack. Check that the height is the same for the left and right brackets. Remove the four screws at the front for attaching the left and right side panels. Attach the AJ-MA75P rack-mounting adapters with included 4 screws.
3
4
5
Remove the 4 rubber legs from the bottom of the unit, and install the unit in the rack. After the unit has been installed, check that it moves smoothly along the rails.
EIA standard rack Fasten it to the rack with set screws.
Rack-mounting adapters
<Notes> � Keep the temperature inside the rack to between +41°F (5°C) and +104°F (40°C). � Bolt the rack securely to the floor so that it will not topple over when the VTR is drawn out.
� 108 �
|
|
|
> |
|