|
|
|
Categories
|
|
Information
|
|
Featured Product
|
|
|
 |
|
|
There are currently no product reviews.
 ;
Minden rendben, de két megjegyzés, az ábrák nehezen kivehetők és a fizetés után 24 órát kell várni a letöltésre.
;
Manual correct, and complete. Downloads cleanly. Format of manual was presumably difficult to PDF to A4, but works reasonably well.
 ;
This was a hard to find manual. When I did find it , some sites wanted way too much for the file.
Owner-manual .com had it for a really reasonable price. Not only that but it was sent very quickly and was a quality scanned document, unlike some others I purchased from a different site.
Good job guys!!
Larry
;
Fast and courteous service. Product delivered as described. Thank you.
;
Last week I bought a second hand Panasonic AG-7500 SVHS Hi-Fi Video Cassette Recorder. It is a professional machine with many video and audio options. I feared it would be a huge quest to find a manual. I was delighted when I found owner-manuals.com. After payment I received the file to download the next day already. The quality is great. I am very happy. Thanks!
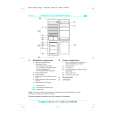
Parts and their functions
Front panel
O P (R) (Q) I
STOP
J
G KF H
START/STOP
K BAR button This is used to switch the images which are output to color bar signals. When lighted:
VTR REW ENABLE MONITOR CHROMA CABLE LENGTH 100m Y/VIDEO CHROMA 50m
ON
FF
PLAY REC CHK
CALL
OFF
VTR WARNING
TALLY
BAR
SET UP
SHUTTER WHITE BAL
AWB
GAIN
ABB
AUTO KNEE
N M
(PUSH)
PR
INTERCOM
MIC
ON OFF
POS2 POS1 SV SS
POS3 B POS4 PRST POS5
A
The color bar signals of the camera recorder are output. When off: The images being shot by the camera recorder are output. L ABB button This is used to adjust the black balance automatically. When lighted: The black balance is now being adjusted. When off: The adjustment of the black balance is completed. Flashing 5 off: The black balance adjustment has failed. M AUTO KNEE button This is used to set the AUTO KNEE function to ON or OFF. When lighted: The AUTO KNEE function is ON. When off: The AUTO KNEE function is OFF. N GAIN button This is used to select the gain value of the video amplifier. 3: The gain value is increased. 4: The gain value is reduced. O SET UP button This displays the menus of the camera recorder. When it is lighted, the menus are displayed on the screen which is connected to the MONITOR connector. P SET UP dial This is used to perform the menu settings. Turn the dial to select a menu, and press it to enter the setting. Menu settings can be performed when the SET UP button O is lighted. If, while the SET UP button is off, the shutter speed selector dial R is set to the SS position, and the SHUTTER button Q is lighted, the SYNCHRO SCAN shutter speed can be set. When the SET UP dial is now turned while keeping it pushed in, the SYNCHRO SCAN shutter speed can be changed continuously. 7
PAINTING
GAIN
POS6
DETAIL R
ENABLE B
BLACK
PB
RCU
CAMERA
L
KNEE POINT PGM
GAMMA GAIN FILTER
AUTO IRIS
IRIS
PUSH
POWER
OFF ON
KNEE SLOPE
M.PED
CHECK
BBS
F CALL button While this button is held down, the tally lamps of the camera recorder are made to light. G TALLY (red) lamp This indicates the red tally signal which is input to the TALLY connector. H TALLY (green) lamp This indicates the green tally signal which is input to the TALLY connector. I WHITE BAL switch This is used to select the white balance memory. PRST: At this setting, the white balance is set to the preset value (3200K). Use it when there is not enough time to adjust the white balance. O The preset value can be set on the camera recorder�s menu to any color temperature. A or B: At this setting, the adjusted white balance value is stored in the memory at the A or B position. J AWB button This is used to adjust the white balance automatically. It does not work when the WHITE BAL switch I is set at the PRST position. When lighted: The white balance is now being adjusted. When off: The adjustment of the white balance is completed. Flashing 5 off: The white balance adjustment has failed.
|
|
|
> |
|